Hi Prof Pranavan, we can work on the existing codebase from SoC (if permitted) and make changes to course content here. This is the least costly, safest fallback option.
This course will be delivered in blended learning mode (i.e., a mix of online and F2F activities) this semester.
Tour 2: Backing up a Repo on the Cloud

Destination: To be able to back up a Git repository on a cloud-based Git service such as GitHub.

Motivation: One (of several) benefits of maintaining a copy of a repo on a cloud server: it acts as a safety net (e.g., against the folder becoming inaccessible due to a hardware fault).

Lesson plan:

To back up your Git repo on the cloud, you’ll need to use a remote repository service, such as GitHub.

  → Lesson: Remote Repositories covers that part.

To use GitHub, you need to prepare some tools/settings first.

  → Lesson: Preparing to use GitHub covers that part.

The first step of backing up a local repo on GitHub: create an empty repository on GitHub.

  → Lesson: Creating a Repo on GitHub covers that part.

The second step of backing up a local repo on GitHub: link the local repo with the remote repo on GitHub.

  → Lesson: Linking a Local Repo With a Remote Repo covers that part.

The third step of backing up a local repo on GitHub: push a copy of the local repo to the remote repo.

  → Lesson: Updating the Remote Repo covers that part.

Git allows you to specify which files should be omitted from reversion control.

  → Lesson: Omitting files from revision control covers that part.

Lesson: Remote Repositories


To back up your Git repo on the cloud, you’ll need to use a remote repository service, such as GitHub.

This lesson covers that part.

A repo you have on your computer is called a local repo. A remote repo is a repo hosted on a remote computer and allows remote access. Some use cases for remote repositories:

  • as a back of your local repo
  • as an intermediary repo to work on the same files from multiple computers
  • for sharing the revision history of a codebase among team members of a multi-person project

It is possible to set up a Git remote repo on your own server, but an easier option is to use a remote repo hosting service such as GitHub, GitLab, or BitBucket. In our case, we will be using GitHub.


Lesson: Preparing to use GitHub


To use GitHub, you need to prepare some tools/settings first.

This lesson covers that part.

  1. Create a GitHub account.
  2. Set up authentication.
  3. Install GitHub CLI.

Lesson: Creating a Repo on GitHub


The first step of backing up a local repo on GitHub: create an empty repository on GitHub.

This lesson covers that part.

You can create a remote repository based on an existing local repository, to serve as a remote copy of you local repo. For example, suppose you created a local repo and worked with it for a while, but now you want to upload it onto GitHub. The first step is to create an empty repository on GitHub.

HANDS-ON: Creating an empty remote repo

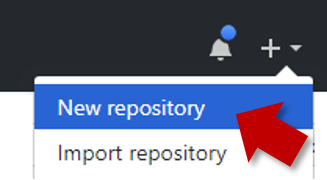
1 Login to your GitHub account and choose to create a new repo.

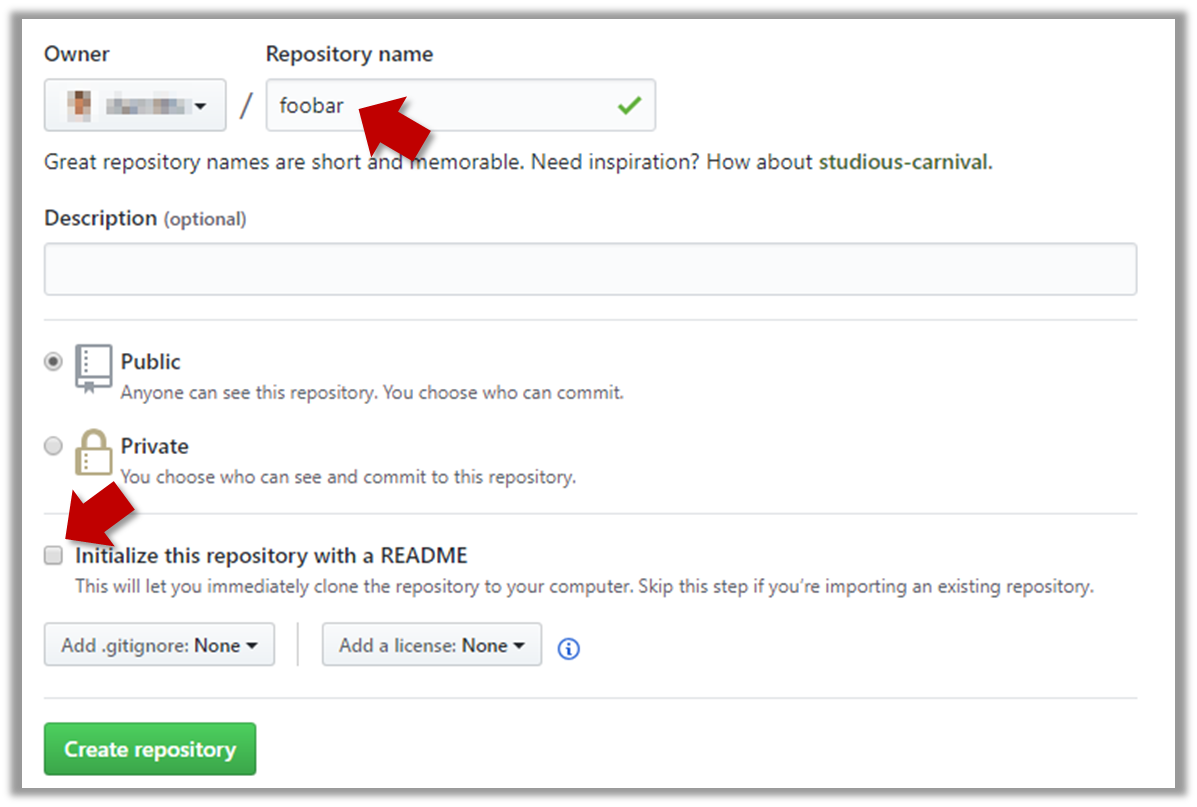
2 In the next screen, provide a name for your repo but keep the Initialize this repo ... tick box unchecked.

3 Note the URL of the repo. It will be of the form https://github.com/{your_user_name}/{repo_name}.git.
e.g., https://github.com/johndoe/foobar.git (note the .git at the end)

EXERCISE: remote-control


Lesson: Linking a Local Repo With a Remote Repo


The second step of backing up a local repo on GitHub: link the local repo with the remote repo on GitHub.

This lesson covers that part.

A Git remote is a reference to a repository hosted elsewhere, usually on a server like GitHub, GitLab, or Bitbucket. It allows your local Git repo to communicate with another remote copy — for example, to upload to commits that you created locally but missing in the remote copy.

By adding a remote, you are informing the local repo details of a remote repo it can communicate with, for example, where the repo exists, what name to use to refer to the remote, and which network protocol to use to communicate with it (e.g., HTTPS vs SSH).

HANDS-ON: Creating an empty repo on GitHub

Add the empty remote repo you created on GitHub as a remote of a local repo you have.

1 In a terminal, navigate to the folder containing the local repo.

2 List the current list of remotes using the git remote -v command, for a sanity check. No output is expected if there are no remotes yet.

3 Add a new remote repo using the git remote add command.
command: git remote add {remote_name} {remote_repo_url}
e.g., git remote add origin https://github.com/johndoe/foobar.git

4 List the remotes again to verify the new remote was added.

git remote -v
origin  https://github.com/johndoe/foobar.git (fetch)
origin  https://github.com/johndoe/foobar.git (push)

The same remote will be listed twice, to show that you can do two operations (fetch and push) using this remote. You can ignore that for now. The important thing is the remote you added is being listed.


1 Open the local repo in Sourcetree.

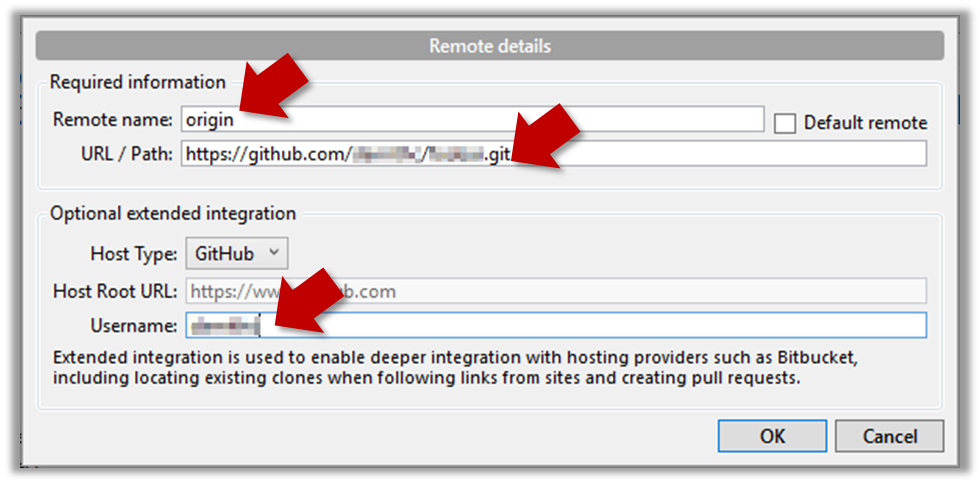
2 Choose RepositoryRepository Settings menu option.

3 Add a new remote to the repo with the following values.

  • Remote name: the name you want to assign to the remote repo e.g., upstream1
  • URL/path: the URL of your repo (ending in .git) that e.g., https://github.com/johndoe/foobar.git
  • Username: your GitHub username


Lesson: Updating the Remote Repo


The third step of backing up a local repo on GitHub: push a copy of the local repo to the remote repo.

This lesson covers that part.

You can push content of one repository to another. Pushing can transfer Git history (e.g., past commits) as well as files in the working directory. Note that pushing to a remote repo requires you to have write-access to it.

When pushing to a remote repo, you typically need to specify the following information:

  • The name of the remote (e.g., origin).
  • The name of your current local branch (e.g., master).

If this is the first time you are pushing this branch to the remote repo, you can also ask Git to track this remote/branch pairing (e.g., remember that this local master branch is tracking the master branch in the upstream repo origin i.e., local master branch is tracking upstream origin/master branch), so in future you can push the same remote/branch without needing to specify them again.

HANDS-ON: Pushing a local repo to an empty remote repo

Here's how you can push the content of a local repo to an empty remote repo (assuming you already have a local repo that is connected to an empty remote repo, from previous hands-on practicals):

# format: git push -u <remote-repo-name> <branch-name>
git push -u origin master

Explanation:

  • push: the Git sub-command that pushes the current local repo content to a remote repo
  • origin: name of the remote
  • master: branch to push
  • -u (or --set-upstream): the flag that tells Git to track that this local master is tracking origin/master branch

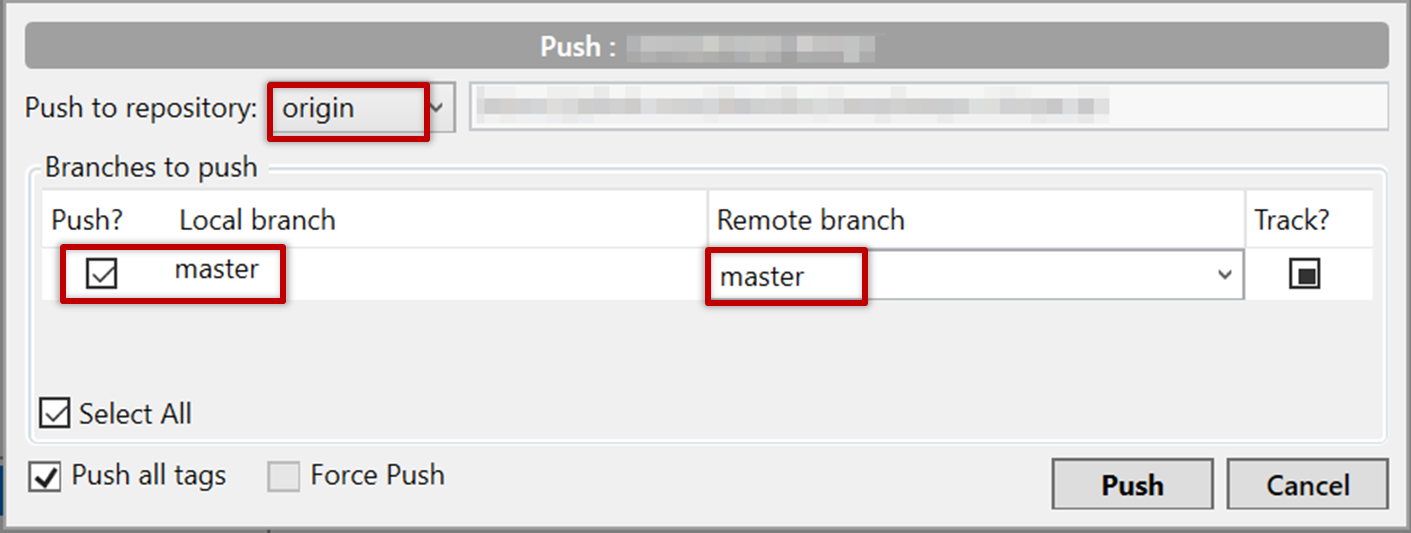
Click the Push button on the main menu, ensure the settings are as follows in the next dialog, ensure the Track option is selected, and click the Push button on the dialog.


The push command can be used repeatedly to send further updates to another repo e.g., to update the remote with commits you created since you pushed the first time.

HANDS-ON: Pushing to send further updates to a repo

Add a few more commits to your local repo, and push those commits to the remote repo, as follows:

1 Commit some changes in your local repo.

2 Push the new commits to your fork on GitHub

Any of the following commands should work:

  • git push origin master
  • git push origin
    (due to tracking you set up earlier, Git will assume you are pushing themaster branch)
  • git push
    (due to tracking, Git will assume you are pushing to the remote origin)

Click the Push button on the main menu, ensure the settings are as follows in the next dialog, and click the Push button on the dialog.


Note that you can push between two repos only if those repos have a shared history among them (i.e., one should have been created by copying the other).

EXERCISE: push-over


DETOUR: Pushing to multiple repos

You can push to any number of repos, as long as the target repos and your repo have a shared history.

  1. Add the GitHub repo URL as a remote while giving a suitable name (e.g., upstream, central, production, myOtherRemote ...), if you haven't done so already.
  2. Push to the target repo -- remember to select the correct target repo when you do.

e.g., git push myOtherRemote master.


Lesson: Omitting files from revision control


Git allows you to specify which files should be omitted from reversion control.

This lesson covers that part.

You can specify which files Git should omit from reversion control. While you can always omit files from revision control simply by not staging them, having an 'ignore-list' is more convenient, especially if there are files inside the working folder that are not suitable for revision control (e.g., temporary log files) or files you want to prevent from accidentally including in a commit (files containing confidential information).

A repo-specific ignore-list of files can be specified in a .gitignore file, stored in the root of the repo folder.

HANDS-ON: Adding a file to the ignore-list

1 Add a file into your repo's working folder that you presumably do not want to revision-control e.g., a file named temp.txt. Observe how Git has detected the new file.

2 Configure Git to ignore that file:

Create a file named .gitignore in the working directory root and add the following line in it.

.gitignore
temp.txt

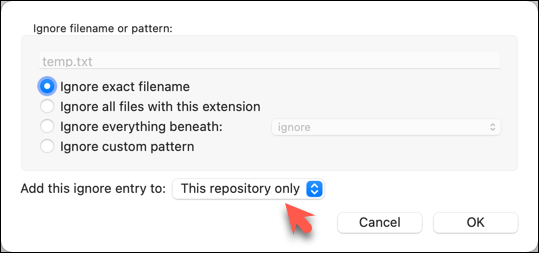
The file should be currently listed under Unstaged files. Right-click it and choose Ignore…. Choose Ignore exact filename(s) and click OK.

Observe that a file named .gitignore has been created in the working directory root and has the following line in it.

.gitignore
temp.txt

The .gitignore file

The .gitignore file tells Git which files to ignore when tracking revision history. That file itself can be either revision controlled or ignored.

  • To version control it (the more common choice – which allows you to track how the .gitignore file changes over time), simply commit it as you would commit any other file.

  • To ignore it, follow the same steps you followed above when you set Git to ignore the temp.txt file.

  • It supports file patterns e.g., adding temp/*.tmp to the .gitignore file prevents Git from tracking any .tmp files in the temp directory.

More information about the .gitignore file: git-scm.com/docs/gitignore

Files recommended to be omitted from version control

  • Binary files generated when building your project e.g., *.class, *.jar, *.exe (reasons: 1. no need to version control these files as they can be generated again from the source code 2. Revision control systems are optimized for tracking text-based files, not binary files.
  • Temporary files e.g., log files generated while testing the product
  • Local files i.e., files specific to your own computer e.g., local settings of your IDE
  • Sensitive content i.e., files containing sensitive/personal information e.g., credential files, personal identification data (especially, if there is a possibility of those files getting leaked via the revision control system).

What you learned: You should now be able to creat a copy of your repo on GitHub, and keep it updated as you add more commits to your local repo. If something goes wrong with your local repo (e.g., disk crash), you can now recover the repo using the remote repo (this tour did not cover how exactly you can do that -- it will be covered in a future tour).

What's next: Tour 3: Using the Revision History of a Repo