Destination: To be able to make use of the revision history stored by Git.
Motivation: Having put in effort to record the revision history of the working folder, it only makes sense that we use the revision history to our benefit. For example, to be able to answer questions such as "What did I change in this file since last Monday?"
Lesson plan:
→ Lesson: Examining the Revision History covers that part.
→ Lesson: Traversing to a Specific Snapshot covers that part.
→ Lesson: Tagging Commits covers that part.
→ Lesson: Comparing Points of History covers that part.
It is useful to be able to visualise the commits timeline, aka the revision graph.
The Git data model consists of two types of entities: objects and refs (short for _references). In this lesson, you will encounter examples of both.
A Git revision graph is visualisation of a repo's revision history, contains examples of both objects and refs. First, let us learn to work with simpler revision graphs consisting of one branch, such as the one given below.
Nodes in the revision graph represent commits.
- A commit is one of four main types of Git objects (blobs, trees, and annotated tags are the other three, to be covered later).
- A commit identified by its SHA value. A SHA (Secure Hash Algorithm) value is a unique identifier generated by Git to represent each commit. It is produced by using SHA-1 (i.e., one of the algorithms in the SHA family of cryptographic hash functions) on the entire content of the commit. It's a 40-character hexadecimal string (e.g.,
f761ea63738a67258628e9e54095b88ea67d95e2) that acts like a fingerprint, ensuring that every commit can be referenced unambiguously. - A commit is a full snapshot of the working directory, constructed based on the previous commit, and the changes staged. The previous commit a commit is based on is called the parent commit (some commits can have multiple parent commits -- we’ll cover that later).
Edges in the revision graph represent links between a commit and its parent commit(s) In some revision graph visualisations, you might see arrows (instead of lines) showing how each commit points to its parent commit.
Git uses refs to name and keep track of various points in a repository’s history. These refs are essentially 'named-pointers' that can serve as bookmarks to reach a certain point in the revision graph using the ref name.
In the revision graph above, there are two refs ← master and ← HEAD.
- ← master is a branch ref. A branch points to the latest commit on a branch. When you create a new commit, the ref of the branch we are currently in moves to the new commit.
- ← HEAD is a special ref. Normally, it points to the current branch (in this example, it is pointing to the
masterbranch), and moves together with the branch ref.
↖ origin/master
In the revision graph above you see a third type of ref (↖ origin/master). This is a remote tracking branch ref that represents the state of a branch in a remote repository (if you previously set up the branch to track a remote branch). In this example, the master branch in the remote origin is also at the commit C3 (which means you have not created new commits after you pushed to the remote).
If you now create a new commit C4, the state of the revision graph will be as follows:
Explanation: When you create C4, the current branch master move to point to C4, and HEAD moves along with it. However, the master branch in the remote origin remains at C3 (because you have not pushed C4 yet).
Let us use Git features to examine the revision graph of a simple repo. For this, use a repo with just a few commits and only one branch for this hands-on practical.
1 First, use a simple git log to view the list of commits.
git log
commit f761ea63738a... (HEAD -> master, origin/master)
Author: ... <...@...>
Date: Sat ...
Add colours.txt, shapes.txt
commit 2bedace69990...
Author: ... <...@...>
Date: Sat ...
Add figs to fruits.txt
commit d5f91de5f0b5...
Author: ... <...@...>
Date: Fri ...
Add fruits.txt
For comparison, given below the visual representation of the same revision graph. As you can see, the log output shows the refs slightly differently, but it is not hard to see what they mean.
↖ origin/masterAdd colours.txt, shapes.txt
2 Use the --oneline flag to get a more concise view. Note how the commit SHA has been truncated to first seven characters (first seven characters of a commit SHA is enough for Git to identify a commit).
git log --oneline
f761ea6 (HEAD -> master, origin/master) Add colours.txt, shapes.txt
2bedace Add figs to fruits.txt
d5f91de Add fruits.txt
3 The --graph flag makes the result closer to a graphical revision graph. Note the * that indicates a node in a revision graph.
git log --oneline --graph
* f761ea6 (HEAD -> master, origin/master) Add colours.txt, shapes.txt
* 2bedace Add figs to fruits.txt
* d5f91de Add fruits.txt
The --graph option is more useful when examining a more complicated revision graph consisting of multiple parallel branches.
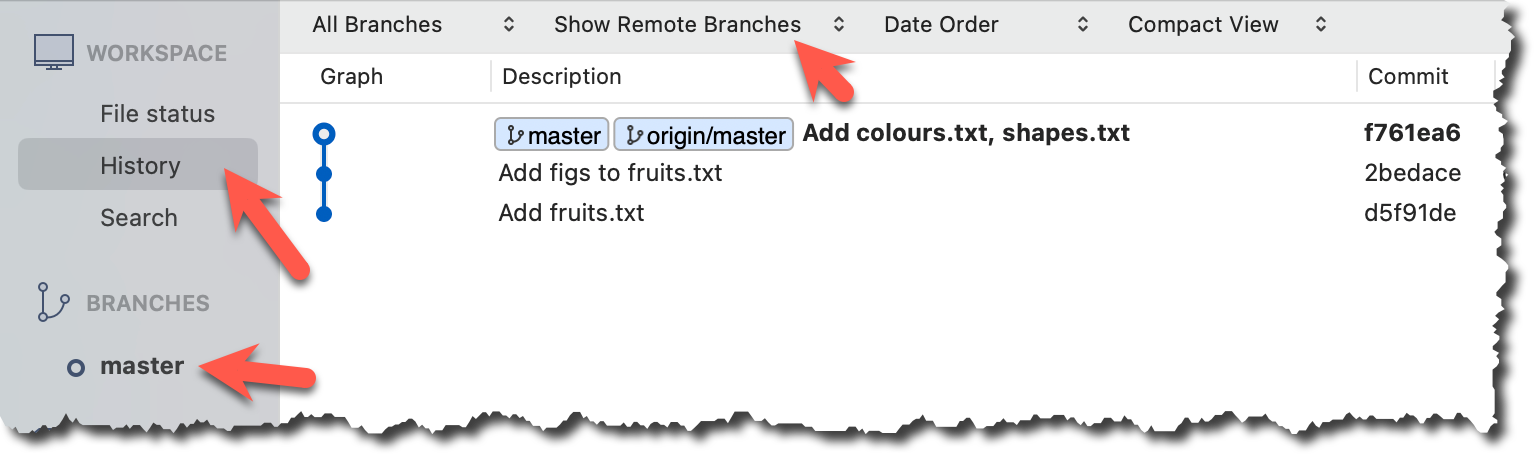
Click the History to see the revision graph.
- In some versions of Sourcetree, the
HEADref may not be shown -- it is implied that theHEADref is pointing to the same commit the currently active branch ref is pointing. - If the remote tracking branch ref (e.g.,
origin/master) is not showing up, you may need to enable theShow Remote Branchesoption.
...
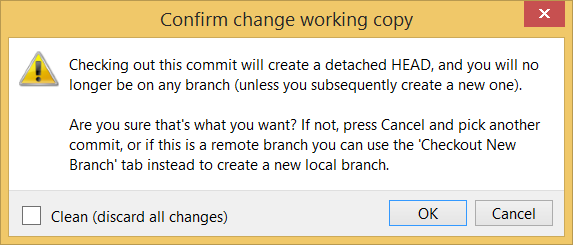
Git can load a specific version of the history to the working directory. Note that if you have uncommitted changes in the working directory, you need to stash them first to prevent them from being overwritten.
Use the checkout <commit-identifier> command to change the working directory to the state it was in at a specific past commit.
git checkout v1.0: loads the state as at commit taggedv1.0git checkout 0023cdd: loads the state as at commit with the hash0023cddgit checkout HEAD~2: loads the state that is 2 commits behind the most recent commit
For now, you can ignore the warning about ‘detached HEAD’.
If you checkout a commit that comes before the commit in which you added the .gitignore file, Git will now show ignored files as ‘unstaged modifications’ because at Git hasn’t been told to ignore those files.
Double-click the commit you want to load to the working directory, or right-click on that commit and choose Checkout....
Click OK to the warning about ‘detached HEAD’ (similar to below).
The specified version is now loaded to the working folder, as indicated by the HEAD label. HEAD is a reference to the currently checked out commit.
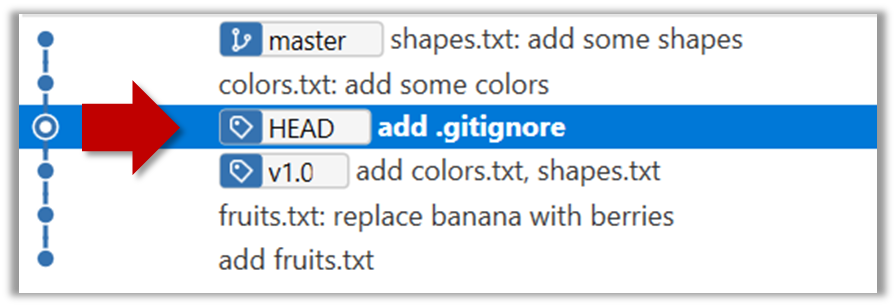
If you checkout a commit that comes before the commit in which you added the .gitignore file, Git will now show ignored files as ‘unstaged modifications’ because at Git hasn’t been told to ignore those files.
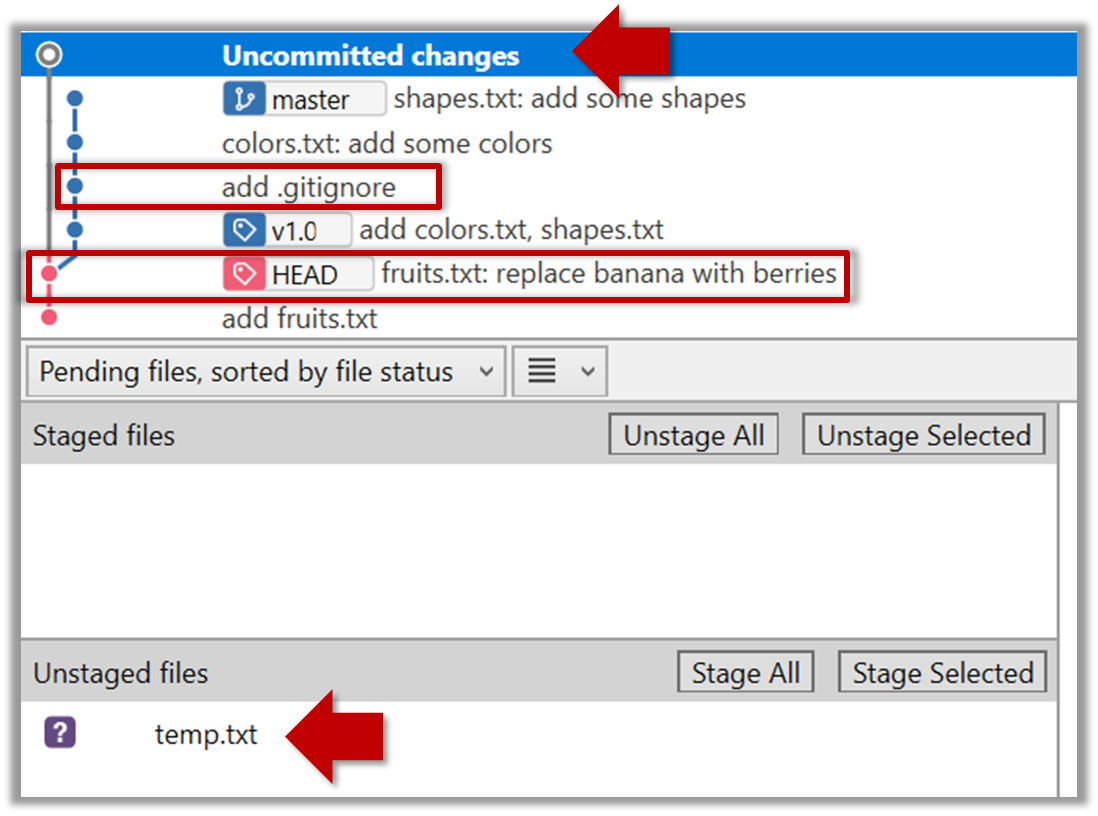
To go back to the latest commit, double-click it.
...
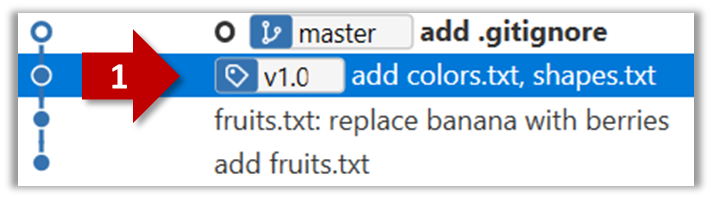
Each Git commit is uniquely identified by a hash e.g., d670460b4b4aece5915caf5c68d12f560a9fe3e4. As you can imagine, using such an identifier is not very convenient for our day-to-day use. As a solution, Git allows adding a more human-readable tag to a commit e.g., v1.0-beta.
Here's how you can tag a commit in a local repo:
To add a tag to the current commit as v1.0:
$ git tag v1.0
To view tags:
$ git tag
To learn how to add a tag to a past commit, go to the ‘Git Basics – Tagging’ page of the git-scm book and refer the ‘Tagging Later’ section.
Right-click on the commit (in the graphical revision graph) you want to tag and choose Tag….
Specify the tag name e.g. v1.0 and click Add Tag.
The added tag will appear in the revision graph view.
After adding a tag to a commit, you can use the tag to refer to that commit, as an alternative to using the hash.
Annotated vs Lightweight Tags: The Git tags explained above are known as lightweight tags. There is another type of Git tags called annotated tags. See git-scm.com/book for more info.
Tags are different from commit messages, in purpose and in form. A commit message is a description of the commit that is part of the commit itself. A tags is a short name for a commit, which exists as a separate entity that points to a commit.
...
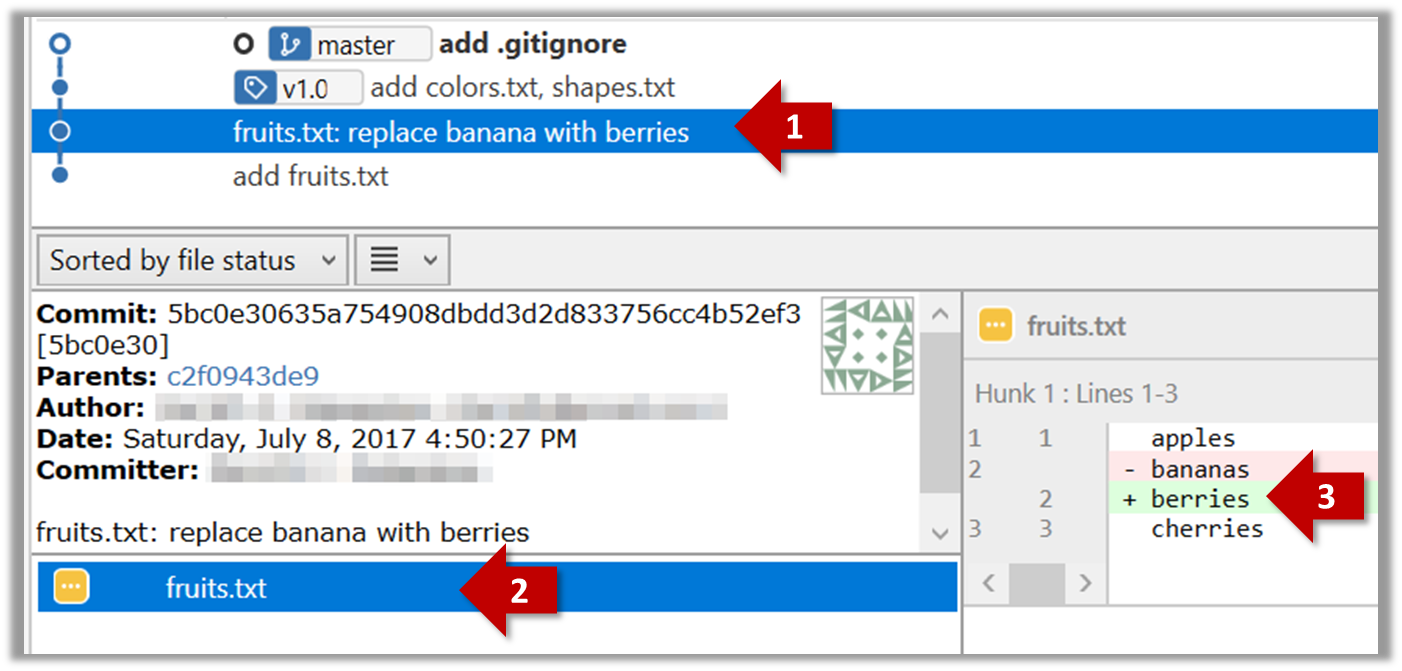
Git can show you what changed in each commit.
$ git show < part-of-commit-hash >
Example:
$ git show 5bc0e306
commit 5bc0e30635a754908dbdd3d2d833756cc4b52ef3
Author: … < … >
Date: Sat Jul 8 16:50:27 2017 +0800
fruits.txt: replace banana with berries
diff --git a/fruits.txt b/fruits.txt
index 15b57f7..17f4528 100644
--- a/fruits.txt
+++ b/fruits.txt
@@ -1,3 +1,3 @@
apples
-bananas
+berries
cherries
To see which files changed in a commit, click on the commit. To see what changed in a specific file in that commit, click on the file name.
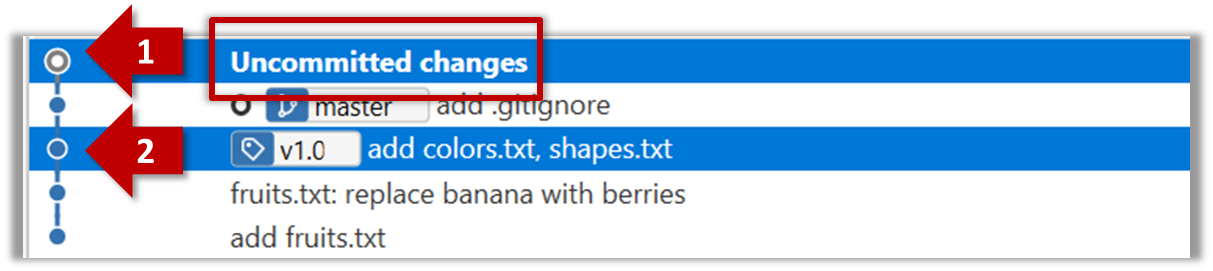
Git can also show you the difference between two points in the history of the repo.
The diff command can be used to view the differences between two points of the history.
git diff: shows the changes (uncommitted) since the last commit.git diff 0023cdd..fcd6199: shows the changes between the points indicated by commit hashes.
Note that when using a commit hash in a Git command, you can use only the first few characters (e.g., first 7-10 chars) as that's usually enough for Git to locate the commit.git diff v1.0..HEAD: shows changes that happened from the commit tagged asv1.0to the most recent commit.
Select the two points you want to compare using Ctrl+Click. The differences between the two selected versions will show up in the bottom half of Sourcetree, as shown in the screenshot below.
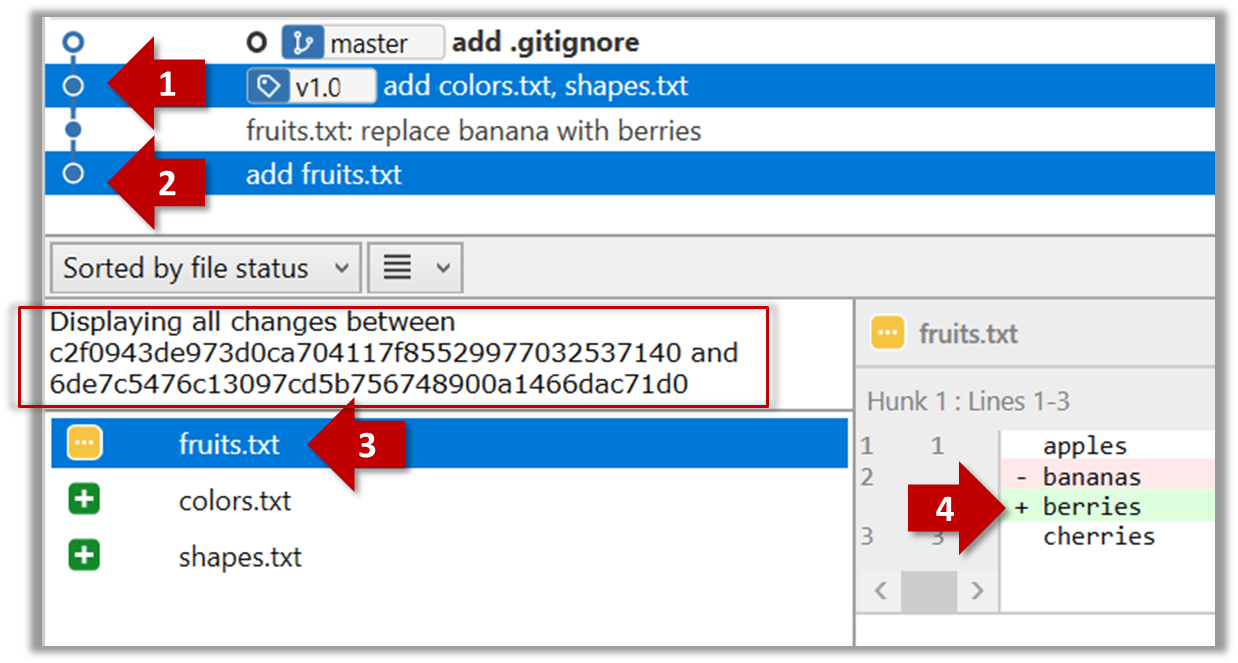
The same method can be used to compare the current state of the working directory (which might have uncommitted changes) to a point in the history.
What you learned: ...
What's next: coming soon ...