Destination: To be able to use Git to systematically record the history of a folder in your own computer. More specifically, to use Git to save a snapshot of the folder at specific points of time.
Motivation: Recoding the history of files in a folder (e.g, code files of a software project, case notes, files related to an article/book that you are authoring) can be useful in case you need to refer to past versions.
Lesson plan:
→ Lesson: Introduction to Revision Control covers that part.
→ Lesson: Preparing to Use Git covers that part.
→ Lesson: Putting a Folder Under Git's Control covers that part.
→ Lesson: Specifying What to include in a Snapshot covers that part.
→ Lesson: Saving a Snapshot covers that part.
To be able to save snapshots of a folder using Git, you must first put the folder under Git's control by initialising a Git repository in that folder.
Normally, we use Git to manage a revision history of a specific folder, which gives us the ability to revision-control any file in that folder and its subfolders.
To put a folder under the control of Git, we initialise a repository (short name: repo) in that folder. This way, we can initialise repos in different folders, to version-control different clusters of files independently of each other e.g., files belonging to different projects.
You can follow the hands-on practical below to learn how to initialise a repo in a folder.
What is this? HANDS-ON panels contain hands-on activities you can do as you learn Git.
1 First, choose a folder. The folder may or may not have any files in it already. For this practical, let us create a folder named things for this purpose.
cd my-projects
mkdir things
2 Then CD into it.
cd things
3 Run the git status command to check the status of the folder.
git status
fatal: not a git repository (or any of the parent directories): .git
Don't panic. The error message is expected. It confirms that the folder currently does not have a Git repo.
4 Now, initialise a repository in that folder.
Use the command git init which should initialise the repo.
git init
Initialized empty Git repository in things/.git/
The output might also contain a hint about a name for an initial branch (e.g., hint: Using 'master' as the name for the initial branch ...). You can ignore that for now.
Note how the output mentions the repo being created in things/.git/ (not things/). More on that later.
Windows: Click
File→Clone/New…→ Click on+ Createbutton on the top menu bar.
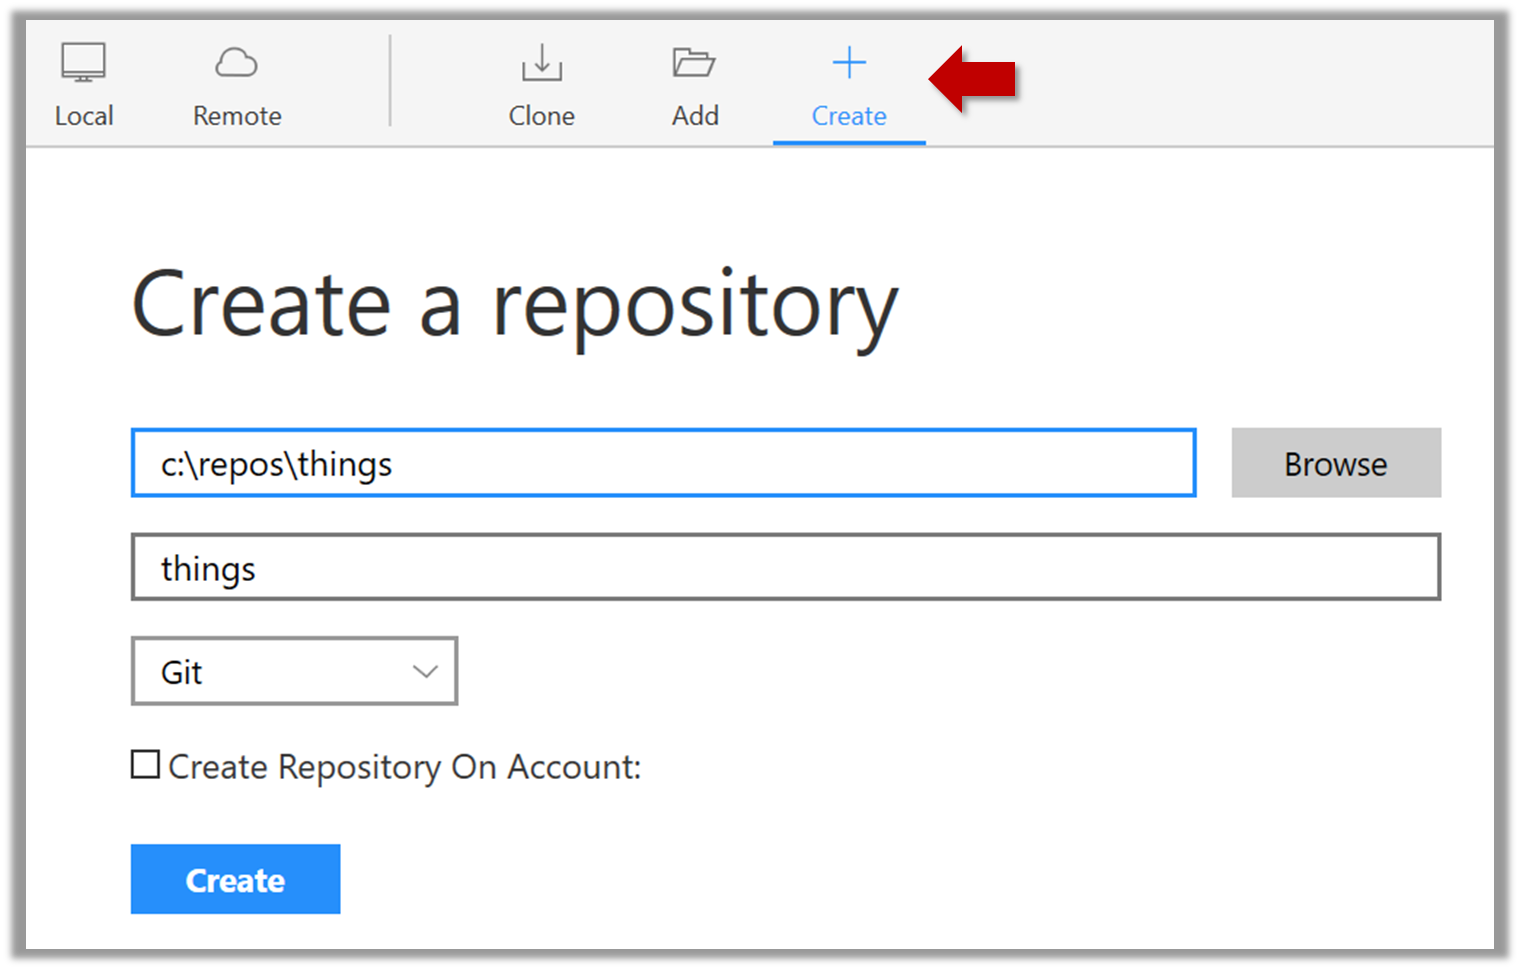
Enter the location of the directory and clickCreate.Mac:
New...→Create Local Repository(orCreate New Repository) → Click...button to select the folder location for the repository → click theCreatebutton.
Initialising a repo results in two things:
- First, Git now recognises this folder as a Git repository, which means it can now help you track the version history of files inside this folder.
To confirm, you can run the git status command. It should respond with something like the following:
git status
On branch master
No commits yet
nothing to commit (create/copy files and use "git add" to track)
Don't worry if you don't understand the output (we will learn about them later); what matters is that it no longer gives an error message as it did before.
- Second, Git created a hidden subfolder named
.gitinside thethingsfolder. This folder will be used by Git to store meta-data about this repository.
What is this? UNDER-THE-HOOD panels explain how a certain Git feature works under the hood i.e., some implementation details.
They can be skipped the first time you are taking a tour. But we recommend that you delve into some of them at some point. Reason: While Git can be used without knowing much about its internal workings, knowing those details will allow you to be more confident when using Git, and harness more of its awesome power.
A Git-controlled folder is divided into two main parts:
- The repository – stored in the hidden
.gitsubfolder, which contains all the metadata and history. - The working directory – everything else in that folder, where you create and edit files.
What is this? EXERCISE panels contain a Git-Mastery exercise that you can download using the Git-Mastery app, and you can use the same app to verify that your solution is correct.
What is this? DETOUR panels contain related directions you can optionally explore. We recommend that you only skim them the first time you are going through a tour (i.e., just to know what each detour covers); you can revisit them later, to deepen your knowledge further, or when you encounter a use case related to the concepts covered by the detour.
To save a snapshot, you start by specifying what to include in it, also called staging.
Git considers new files that you add to the working directory as 'untracked' i.e., Git is aware of them, but they are not yet under Git's control. The same applies to files that existed in the working folder at the time you initialised the repo.
A Git repo has an internal space called the staging area which it uses to build the next snapshot. Another name for the staging area is the index).
We can stage) an untracked file to tell Git that we want its current version to be included in the next snapshot. Once you stage an untracked file, it becomes 'tracked' (i.e., under Git's control).
In the example below, you can see how staging files change the status of the repo as you from (a) to (c).
staging area
[empty]
other meta data ...
├─ fruits.txt (untracked!)
└─ colours.txt (untracked!)
(a) State of the repo, just after initialisation, and creating two files. Both are untracked.
staging area
└─ fruits.txt
other meta data ...
├─ fruits.txt (tracked)
└─ colours.txt (untracked!)
(b) State after staging
fruits.txt.staging area
├─ fruits.txt
└─ colours.txt
other meta data ...
├─ fruits.txt (tracked)
└─ colours.txt (tracked)
(c) State after staging
colours.txt.1 First, add a file (e.g., fruits.txt) to the things folder.
Here is an easy way to do that with a single terminal command.
echo "apples\nbananas\ncherries\n" > fruits.txt
apples
bananas
cherries
2 Stage the new file.
2.1 Check the status of the folder using the git status command.
git status
On branch master
No commits yet
Untracked files:
(use "git add <file>..." to include in what will be committed)
fruits.txt
nothing added to commit but untracked files present (use "git add" to track)
2.2 Use the add command stage the file.
git add fruits.txt
You can replace the add with stage (e.g., git stage fruits.txt) and the result is the same (they are synonyms).
2.3 Check the status again. You can see the file is no longer 'untracked'.
git status
On branch master
No commits yet
Changes to be committed:
(use "git rm --cached <file>..." to unstage)
new file: fruits.txt
As before, don't worry if you don't understand the content of the output (we'll unpack it in a later lesson). The point to note is that the file is no longer listed as 'untracked'.
2.1 Note how the file is shown as ‘unstaged’. The question mark icon indicates the file is untracked.
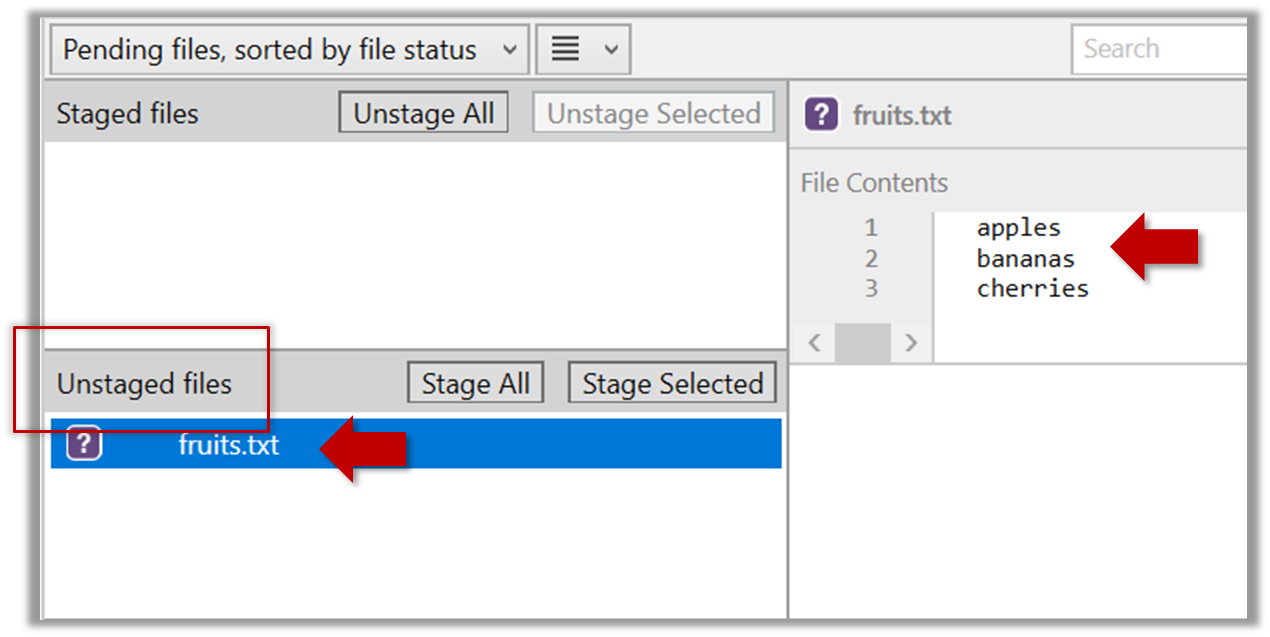
If the newly-added file does not show up in Sourcetree UI, refresh the UI (: F5
| ⌥+R)
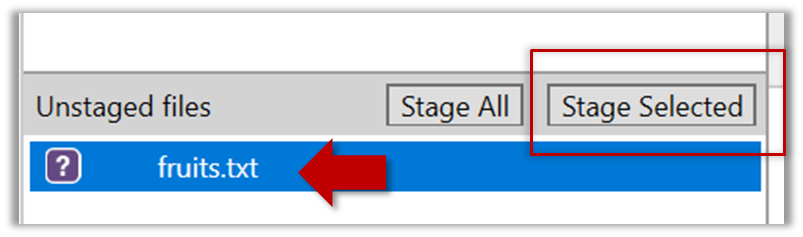
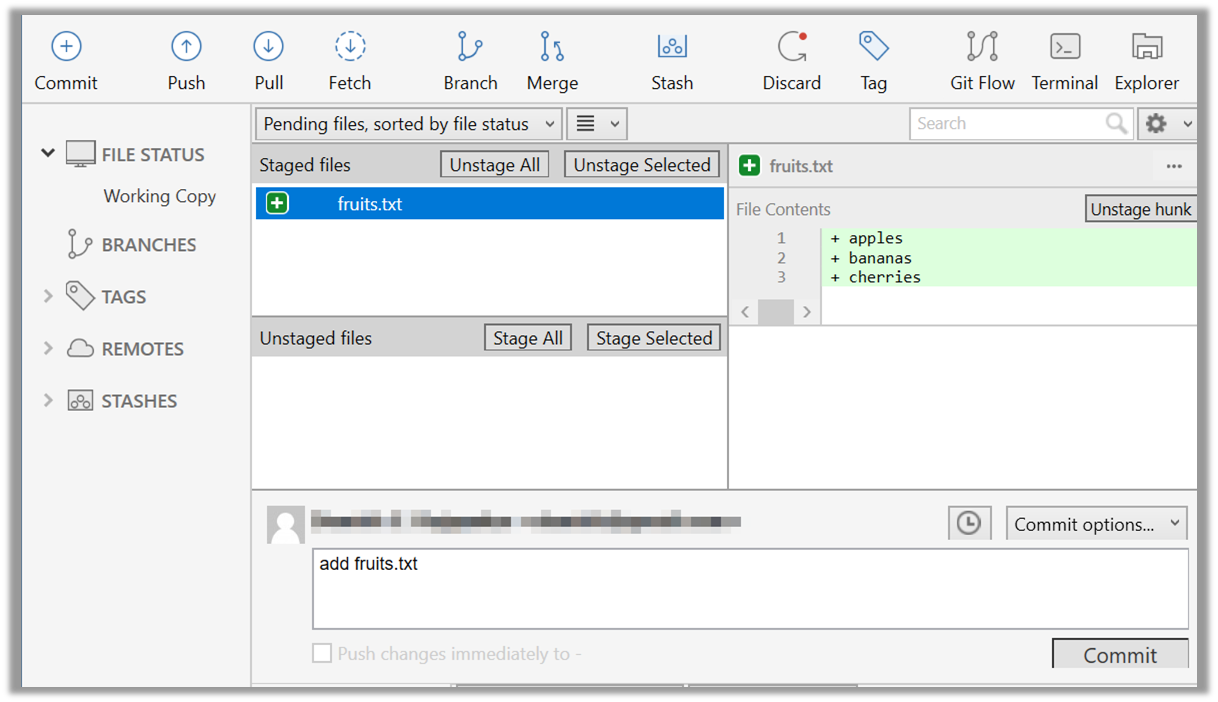
2.2 Stage the file by selecting the fruits.txt and clicking on the Stage Selected button.
2.3 Note how the file is staged now i.e., fruits.txt appears in the Staged files panel now.
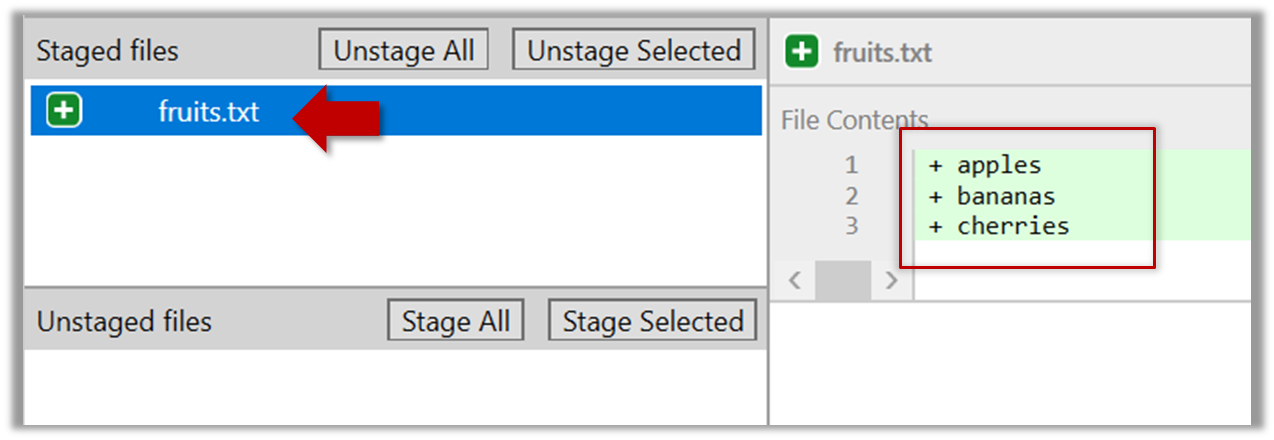
If Sourcetree shows a \ No newline at the end of the file message below the staged lines (i.e., below the cherries line in the above screenshot), that is because you did not hit enter after entering the last line of the file (hence, Git is not sure if that line is complete). To rectify, move the cursor to the end of the last line in that file and hit enter (like you are adding a blank line below it). This new change will now appear as an 'unstaged' change. Stage it as well.
If you modify a staged file, it goes into the 'modified' state i.e., the file contains modifications that are not present in the copy that is waiting (in the staging area) to be included in the next snapshot. If you wish to include these new changes in the next snapshot, you need to stage the file again, which will overwrite the copy of the file that was previously in the staging area.
The example below shows how the status of a file changes when it is modified after it was staged.
staging area
Alice
other meta data ...
Alice
(a) The file names.txt is staged. The copy in the staging area is an exact match to the one in the working directory.
staging area
Alice
other meta data ...
Alice
Bob
(b) State after adding a line to the file. Git indicates it as 'modified' because it now differs from the version in the staged area.
staging area
Alice
Bob
other meta data ...
Alice
Bob
(c) After staging the file again, the staging area is updated with the latest copy of the file, and it is no longer marked as 'modified'.
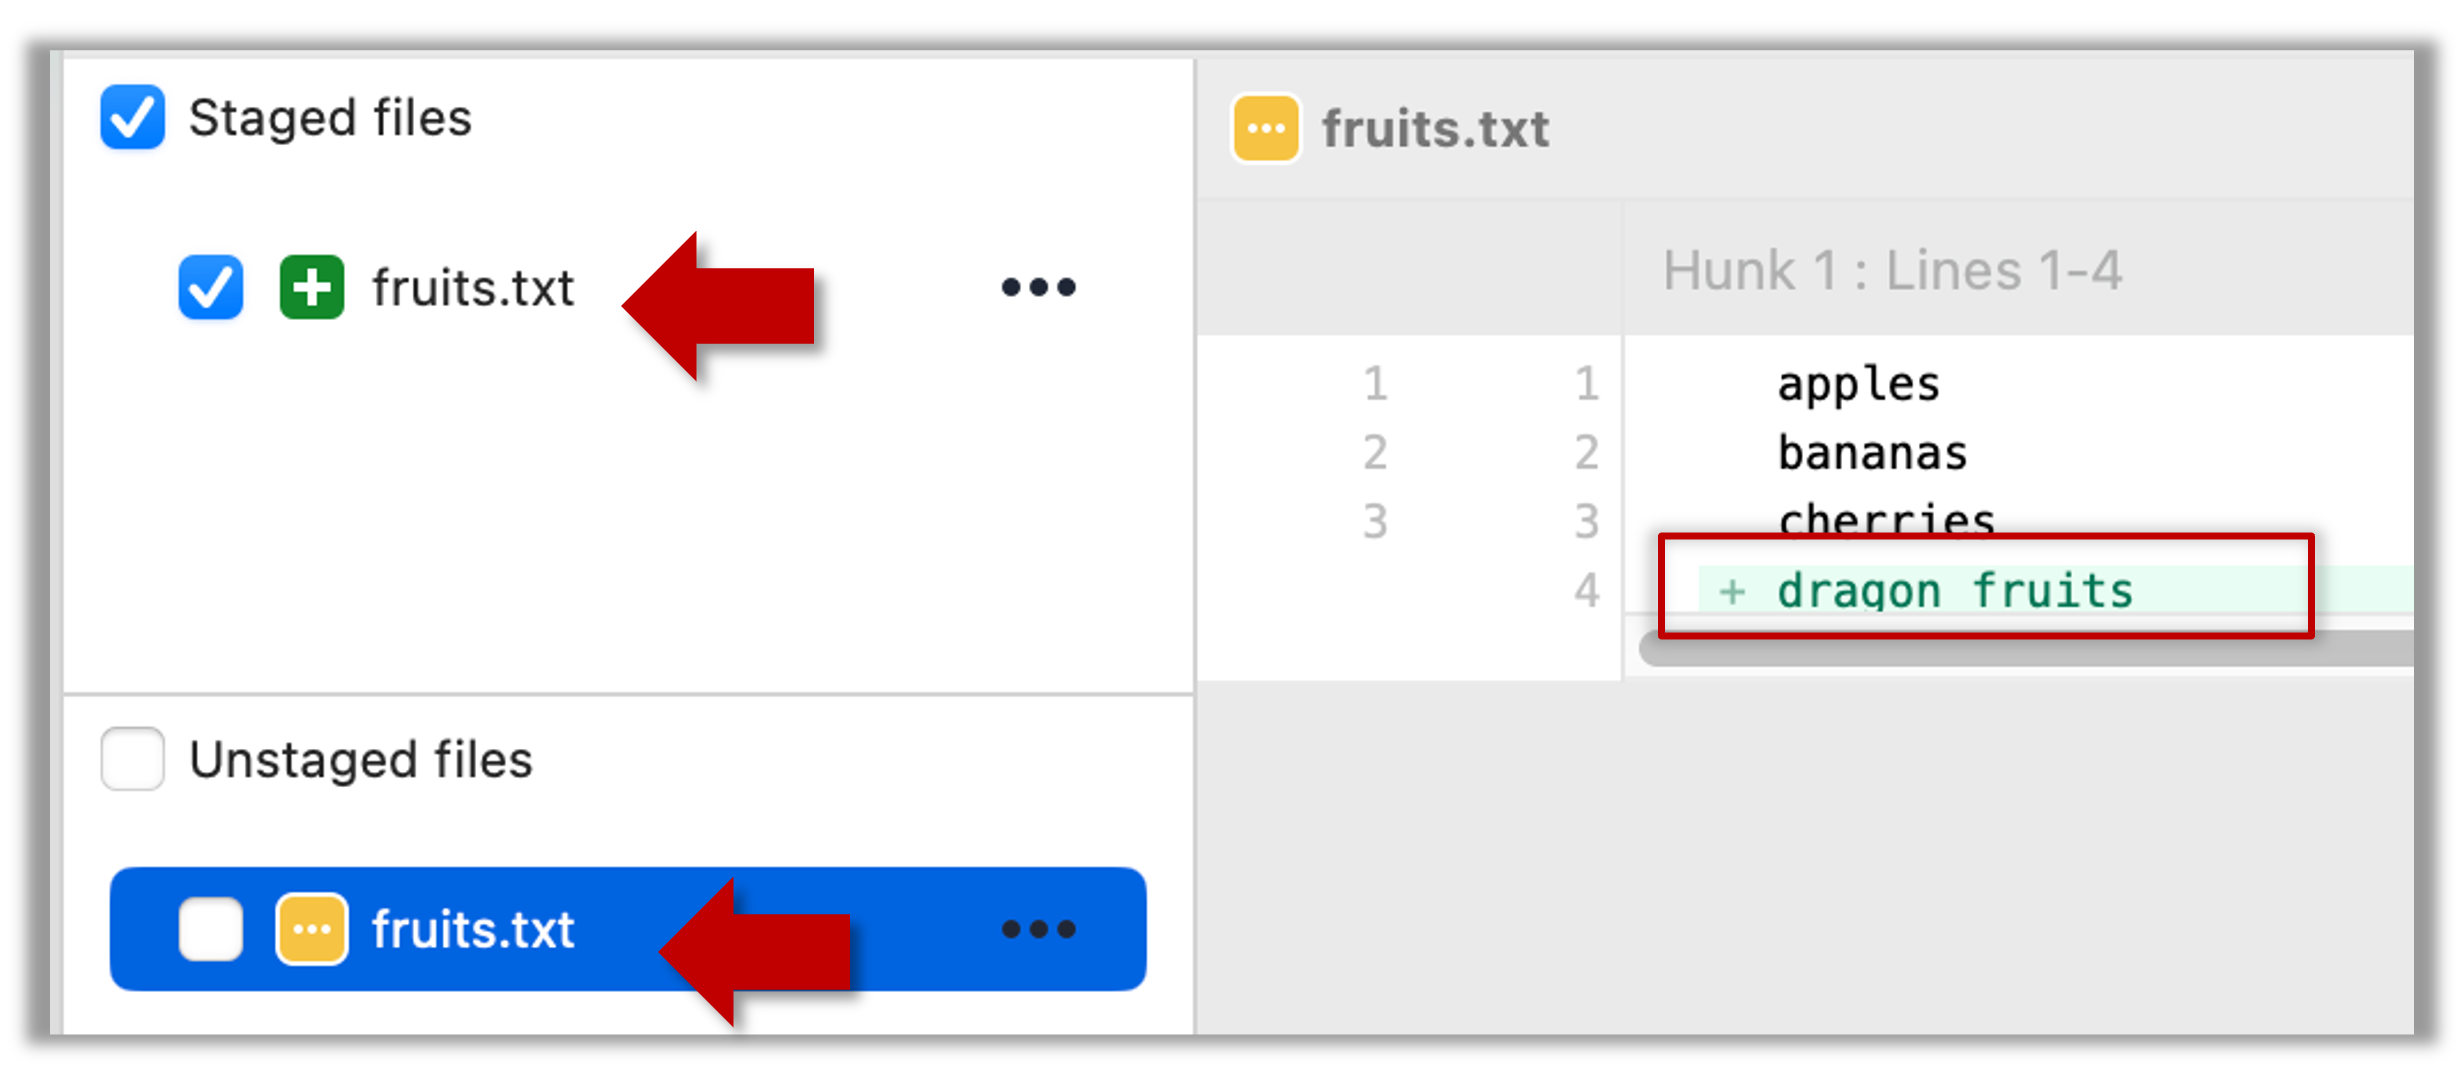
1 First, add another line to fruits.txt, to make it 'modified'.
Here is a way to do that with a single terminal command.
echo "dragon fruits" >> fruits.txt
apples
bananas
cherries
dragon fruits
2 Now, verify that Git sees that file as 'modified'.
Use the git status command to check the status of the working directory.
$ git status
On branch master
No commits yet
Changes to be committed:
(use "git rm --cached <file>..." to unstage)
new file: fruits.txt
Changes not staged for commit:
(use "git add <file>..." to update what will be committed)
(use "git restore <file>..." to discard changes in working directory)
modified: fruits.txt
Note how fruits.txt now appears twice, once as new file: ... (representing the version of the file we staged earlier, which had only three lines) and once as modified: ... (representing the latest version of the file which now has a fourth line).
Note how fruits.txt appears in the Staged files panel as well as 'Unstaged files'.
3 Stage the file again, the same way you added/staged it earlier.
4 Verify that Git no longer sees it as 'modified', similar to step 2.
Git does not track empty folders. You can test this by adding an empty subfolder inside the things folder (e.g., things/more-things and checking if it shows up as 'untracked' (it will not). If you add a file to that folder (e.g., things/more-things/food.txt) and then staged that file (e.g., git add more-things/food.txt), the folder will now be included in the next snapshot.
after staging, you can now proceed to save the snapshot, aka creating a commit.
Saving a snapshot is called committing and a saved snapshot is called a commit.
A git commit is a snapshot of your project based on the files you have staged, more precisely, a record of the exact state of all files in the staging area (index) at that moment -- even the files that have not changed since the last commit. Consequently, a commit has all the information it needs to recreate the tracked files in the working folder at the time the commit was created.
A commit also includes metadata such as the author, date, and an optional commit message describing the change.
A Git commit is a snapshot of all tracked files, not simply a delta of what changed since last commit.
Assuming you have previously staged changes to the fruits.txt, go ahead and create a commit.
1 First, let us do a sanity check using the git status command.
git status
On branch master
No commits yet
Changes to be committed:
(use "git rm --cached <file>..." to unstage)
new file: fruits.txt
2 Now, create a commit using the commit command. The -m switch is used to specify the commit message.
git commit -m "Add fruits.txt"
[master (root-commit) d5f91de] Add fruits.txt
1 file changed, 5 insertions(+)
create mode 100644 fruits.txt
3 Verify the staging area is empty using the git status command again.
git status
On branch master
nothing to commit, working tree clean
Note how the output says nothing to commit which means the staging area is now empty.
Click the Commit button, enter a commit message (e.g. add fruits.txt) into the text box, and click Commit.
Git commits form a timeline, as each corresponds to a point in time when you asked Git to take a snapshot of your working directory. Each commit links to at least one previous commit, forming a structure that we can traverse.
A timeline of commits is called a branch. By default, Git names the initial branch master -- though many now use main instead. You'll learn more about branches in future lessons. For now, just be aware that the commits you create in a new repo will be on a branch called master (or main) by default.
gitGraph
    %%{init: { 'theme': 'default', 'gitGraph': {'mainBranchName': 'master (or main)'}} }%%
    commit id: "Add fruits.txt"
    commit id: "Update fruits.txt"
    commit id: "Add colours.txt"
    commit id: "..."
Git can show you the list of commits in the Git history.
1 View the list of commits, which should show just the one commit you created just now.
You can use the git log command to see the commit history.
git log
commit d5f91de... (HEAD -> master)
Author: ... <...@...>
Date: ...
Add fruits.txt
Use the Q key to exit the output screen of the git log command.
Note how the output has some details about the commit you just created. You can ignore most of it for now, but notice it also shows the commit message you provided.
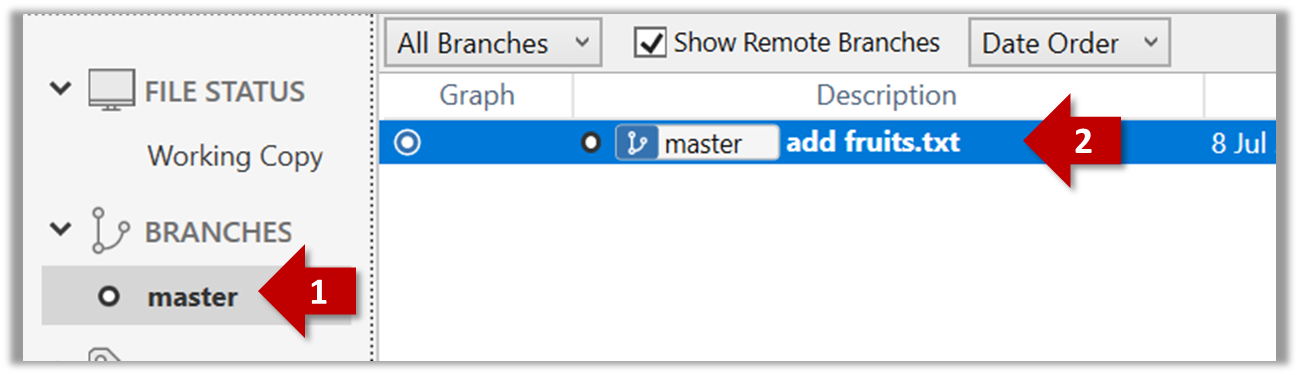
Expand the BRANCHES menu and click on the master to view the history graph, which contains only one node at the moment, representing the commit you just added. For now, ignore the label master attached to the commit.
2 Create a few more commits (i.e., a few rounds of add/edit files -> stage -> commit), and observe how the list of commits grows.
Here is a example list of bash commands to add two commits while observing the list of commits
$ echo "figs" >> fruits.txt # add another line to fruits.txt
$ git add fruits.txt # stage the updated file
$ git commit -m "Insert figs into fruits.txt" # commit the changes
$ git log # check commits list
$ echo "a file for colours" >> colours.txt # add a colours.txt file
$ echo "a file for shapes" >> shapes.txt # add a shapes.txt file
$ git add colours.txt shapes.txt # stage both files in one go
$ git commit -m "Add colours.txt, shapes.txt" # commit the changes
$ git log # check commits list
The output of the final git log should be something like this:
commit 18300... (HEAD -> master)
Author: ... <...@...>
Date: ...
Add colours.txt, shapes.txt
commit 2beda...
Author: ... <...@...>
Date: ...
Insert figs into fruits.txt
commit d5f91...
Author: ... <...@...>
Date: ...
Add colours.txt, shapes.txt
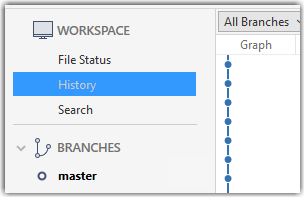
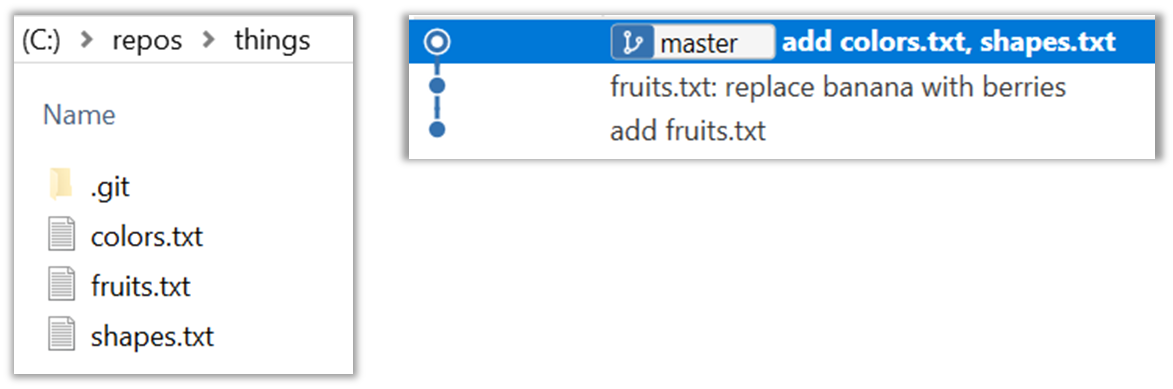
To see the list of commits, click on the History item (listed under the WORKSPACE section) on the menu on the right edge of Sourcetree.
After adding two more commits, the list of commits should look something like this:
What you learned: You should now be able to initialise a Git repository in a folder and commit snapshots of its files at times of your choice. So far, you did not learn how to actually make use of those snapshots (other than to show a list of them) -- we will do that in later tours.
What's next: Tour 2: Backing up a Repo on the Cloud
Destination: To be able to back up a Git repository on a cloud-based Git service such as GitHub.
Motivation: One (of several) benefits of maintaining a copy of a repo on a cloud server: it acts as a safety net (e.g., against the folder becoming inaccessible due to a hardware fault).
Lesson plan:
→ Lesson: Remote Repositories covers that part.
→ Lesson: Preparing to use GitHub covers that part.
→ Lesson: Creating a Repo on GitHub covers that part.
→ Lesson: Linking a Local Repo With a Remote Repo covers that part.
→ Lesson: Updating the Remote Repo covers that part.
→ Lesson: Omitting files from revision control covers that part.
The first step of backing up a local repo on GitHub: create an empty repository on GitHub.
You can create a remote repository based on an existing local repository, to serve as a remote copy of you local repo. For example, suppose you created a local repo and worked with it for a while, but now you want to upload it onto GitHub. The first step is to create an empty repository on GitHub.
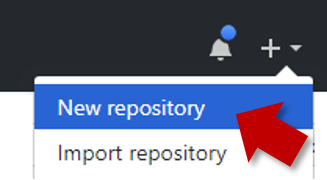
1 Login to your GitHub account and choose to create a new repo.
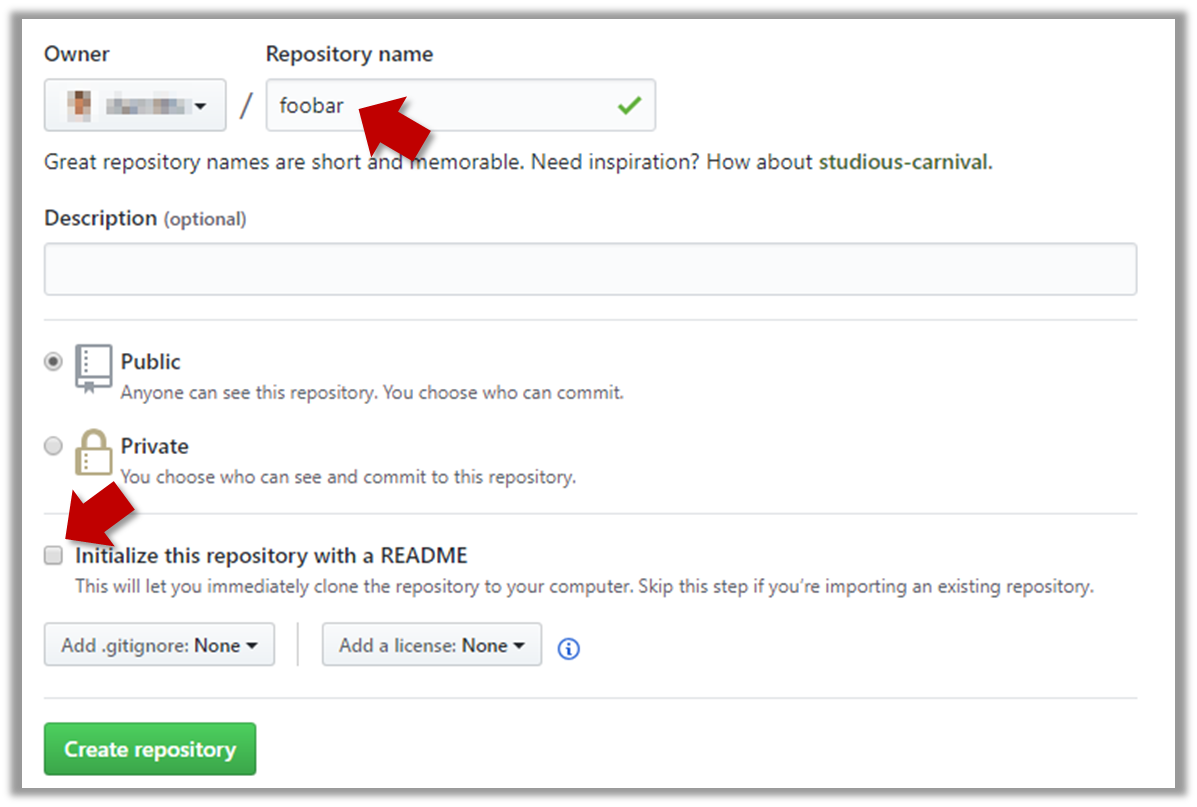
2 In the next screen, provide a name for your repo but keep the Initialize this repo ... tick box unchecked.
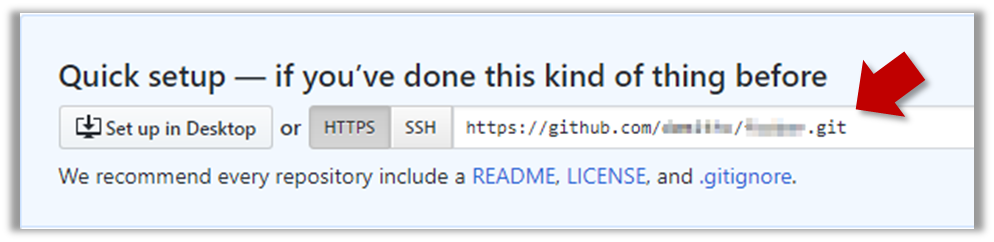
3 Note the URL of the repo. It will be of the form https://github.com/{your_user_name}/{repo_name}.git.
e.g., https://github.com/johndoe/foobar.git (note the .git at the end)
The second step of backing up a local repo on GitHub: link the local repo with the remote repo on GitHub.
A Git remote is a reference to a repository hosted elsewhere, usually on a server like GitHub, GitLab, or Bitbucket. It allows your local Git repo to communicate with another remote copy — for example, to upload to commits that you created locally but missing in the remote copy.
By adding a remote, you are informing the local repo details of a remote repo it can communicate with, for example, where the repo exists, what name to use to refer to the remote, and which network protocol to use to communicate with it (e.g., HTTPS vs SSH).
Add the empty remote repo you created on GitHub as a remote of a local repo you have.
1 In a terminal, navigate to the folder containing the local repo.
2 List the current list of remotes using the git remote -v command, for a sanity check. No output is expected if there are no remotes yet.
3 Add a new remote repo using the git remote add command.
command: git remote add {remote_name} {remote_repo_url}
e.g., git remote add origin https://github.com/johndoe/foobar.git
4 List the remotes again to verify the new remote was added.
git remote -v
origin https://github.com/johndoe/foobar.git (fetch)
origin https://github.com/johndoe/foobar.git (push)
The same remote will be listed twice, to show that you can do two operations (fetch and push) using this remote. You can ignore that for now. The important thing is the remote you added is being listed.
1 Open the local repo in Sourcetree.
2 Choose Repository → Repository Settings menu option.
3 Add a new remote to the repo with the following values.
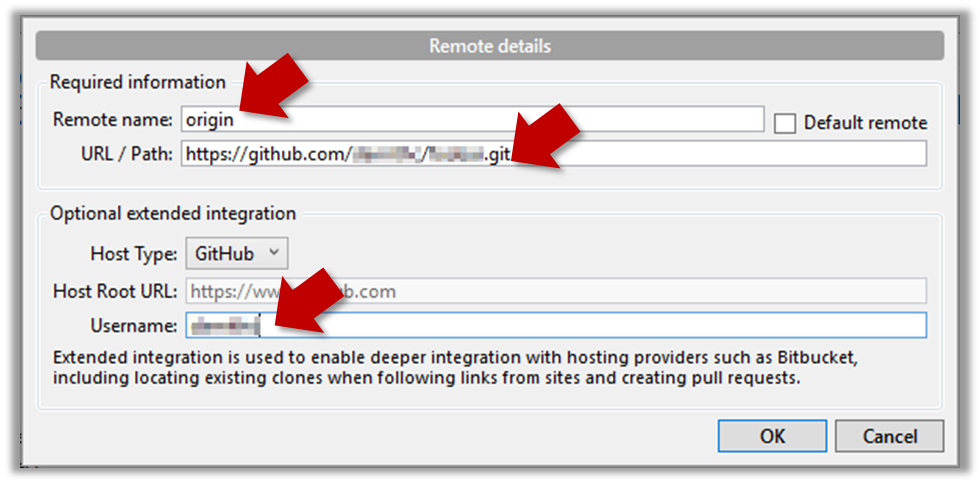
Remote name: the name you want to assign to the remote repo e.g.,upstream1URL/path: the URL of your repo (ending in.git) that e.g.,https://github.com/johndoe/foobar.gitUsername: your GitHub username
The third step of backing up a local repo on GitHub: push a copy of the local repo to the remote repo.
You can push content of one repository to another. Pushing can transfer Git history (e.g., past commits) as well as files in the working directory. Note that pushing to a remote repo requires you to have write-access to it.
When pushing to a remote repo, you typically need to specify the following information:
- The name of the remote (e.g.,
origin). - The name of your current local branch (e.g.,
master).
If this is the first time you are pushing this branch to the remote repo, you can also ask Git to track this remote/branch pairing (e.g., remember that this local master branch is tracking the master branch in the upstream repo origin i.e., local master branch is tracking upstream origin/master branch), so in future you can push the same remote/branch without needing to specify them again.
Here's how you can push the content of a local repo to an empty remote repo (assuming you already have a local repo that is connected to an empty remote repo, from previous hands-on practicals):
# format: git push -u <remote-repo-name> <branch-name>
git push -u origin master
Explanation:
push: the Git sub-command that pushes the current local repo content to a remote repoorigin: name of the remotemaster: branch to push-u(or--set-upstream): the flag that tells Git to track that this localmasteris trackingorigin/masterbranch
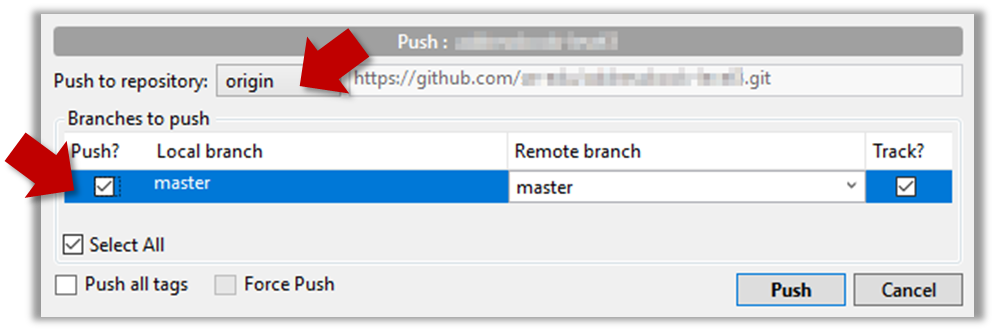
Click the Push button on the main menu, ensure the settings are as follows in the next dialog, ensure the Track option is selected, and click the Push button on the dialog.
The push command can be used repeatedly to send further updates to another repo e.g., to update the remote with commits you created since you pushed the first time.
Add a few more commits to your local repo, and push those commits to the remote repo, as follows:
1 Commit some changes in your local repo.
2 Push the new commits to your fork on GitHub
Any of the following commands should work:
git push origin mastergit push origin
(due to tracking you set up earlier, Git will assume you are pushing themasterbranch)git push
(due to tracking, Git will assume you are pushing to the remoteorigin)
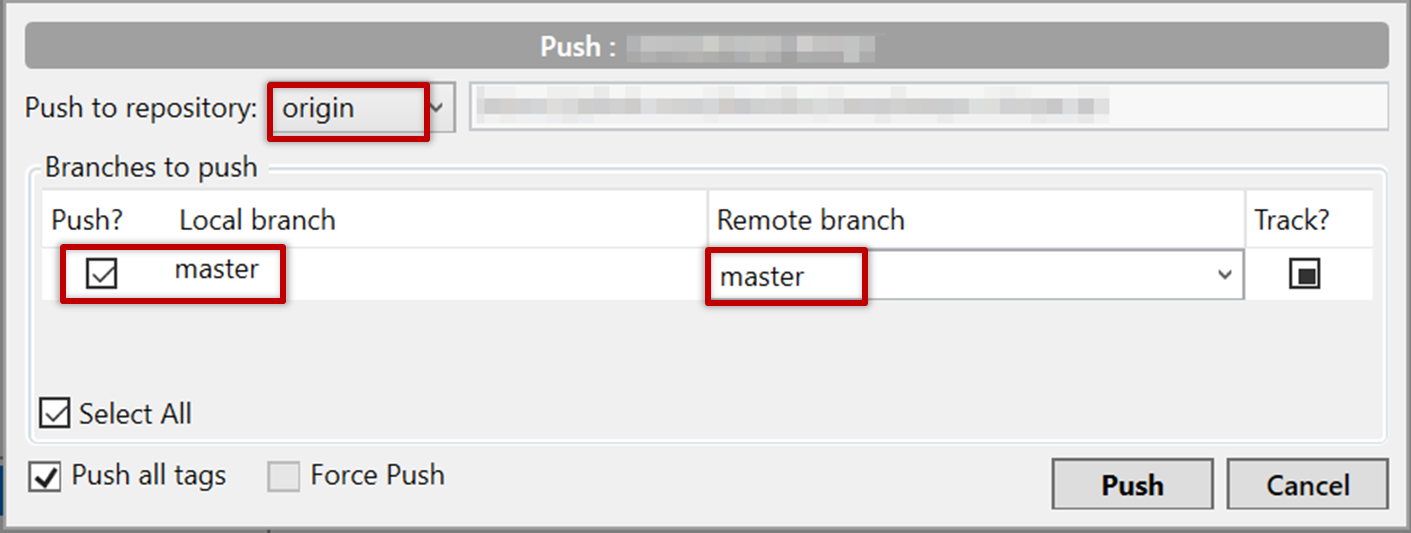
Click the Push button on the main menu, ensure the settings are as follows in the next dialog, and click the Push button on the dialog.
Note that you can push between two repos only if those repos have a shared history among them (i.e., one should have been created by copying the other).
DETOUR: Pushing to multiple repos
You can push to any number of repos, as long as the target repos and your repo have a shared history.
- Add the GitHub repo URL as a remote while giving a suitable name (e.g.,
upstream,central,production,myOtherRemote...), if you haven't done so already. - Push to the target repo -- remember to select the correct target repo when you do.
e.g., git push myOtherRemote master.
Git allows you to specify which files should be omitted from reversion control.
You can specify which files Git should omit from reversion control. While you can always omit files from revision control simply by not staging them, having an 'ignore-list' is more convenient, especially if there are files inside the working folder that are not suitable for revision control (e.g., temporary log files) or files you want to prevent from accidentally including in a commit (files containing confidential information).
A repo-specific ignore-list of files can be specified in a .gitignore file, stored in the root of the repo folder.
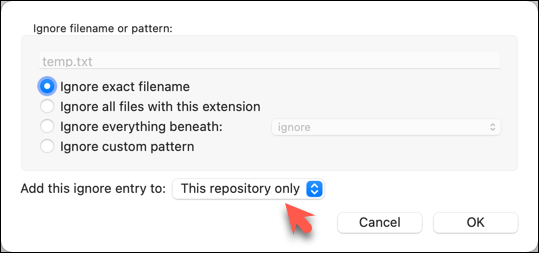
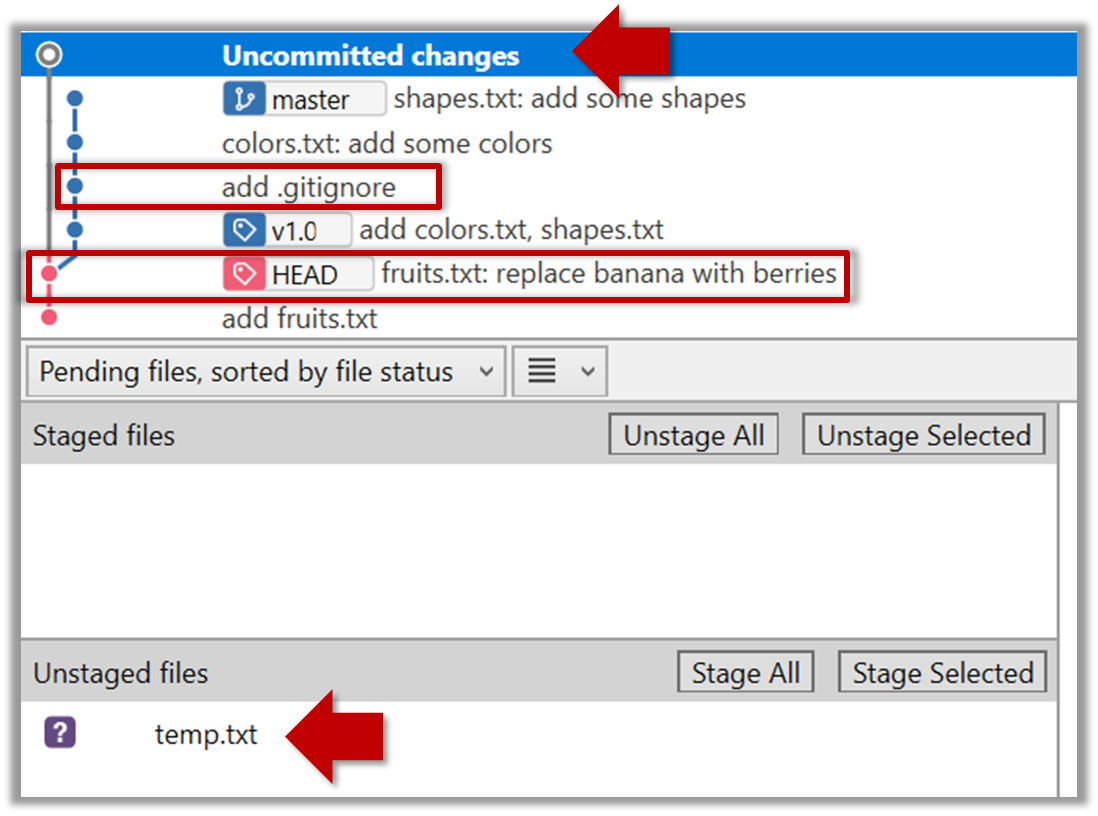
1 Add a file into your repo's working folder that you presumably do not want to revision-control e.g., a file named temp.txt. Observe how Git has detected the new file.
2 Configure Git to ignore that file:
Create a file named .gitignore in the working directory root and add the following line in it.
temp.txt
The file should be currently listed under Unstaged files. Right-click it and choose Ignore…. Choose Ignore exact filename(s) and click OK.
Observe that a file named .gitignore has been created in the working directory root and has the following line in it.
temp.txt
The .gitignore file
The .gitignore file tells Git which files to ignore when tracking revision history. That file itself can be either revision controlled or ignored.
To version control it (the more common choice – which allows you to track how the
.gitignorefile changes over time), simply commit it as you would commit any other file.To ignore it, follow the same steps you followed above when you set Git to ignore the
temp.txtfile.It supports file patterns e.g., adding
temp/*.tmpto the.gitignorefile prevents Git from tracking any.tmpfiles in thetempdirectory.
More information about the .gitignore file: git-scm.com/docs/gitignore
Files recommended to be omitted from version control
- Binary files generated when building your project e.g.,
*.class,*.jar,*.exe(reasons: 1. no need to version control these files as they can be generated again from the source code 2. Revision control systems are optimized for tracking text-based files, not binary files. - Temporary files e.g., log files generated while testing the product
- Local files i.e., files specific to your own computer e.g., local settings of your IDE
- Sensitive content i.e., files containing sensitive/personal information e.g., credential files, personal identification data (especially, if there is a possibility of those files getting leaked via the revision control system).
What you learned: You should now be able to creat a copy of your repo on GitHub, and keep it updated as you add more commits to your local repo. If something goes wrong with your local repo (e.g., disk crash), you can now recover the repo using the remote repo (this tour did not cover how exactly you can do that -- it will be covered in a future tour).
What's next: Tour 3: Using the Revision History of a Repo
Destination: To be able to make use of the revision history stored by Git.
Motivation: Having put in effort to record the revision history of the working folder, it only makes sense that we use the revision history to our benefit. For example, to be able to answer questions such as "What did I change in this file since last Monday?"
Lesson plan:
→ Lesson: Examining the Revision History covers that part.
→ Lesson: Traversing to a Specific Snapshot covers that part.
→ Lesson: Tagging Commits covers that part.
→ Lesson: Comparing Points of History covers that part.
It is useful to be able to visualise the commits timeline, aka the revision graph.
The Git data model consists of two types of entities: objects and refs (short for _references). In this lesson, you will encounter examples of both.
A Git revision graph is visualisation of a repo's revision history, contains examples of both objects and refs. First, let us learn to work with simpler revision graphs consisting of one branch, such as the one given below.
Nodes in the revision graph represent commits.
- A commit is one of four main types of Git objects (blobs, trees, and annotated tags are the other three, to be covered later).
- A commit identified by its SHA value. A SHA (Secure Hash Algorithm) value is a unique identifier generated by Git to represent each commit. It is produced by using SHA-1 (i.e., one of the algorithms in the SHA family of cryptographic hash functions) on the entire content of the commit. It's a 40-character hexadecimal string (e.g.,
f761ea63738a67258628e9e54095b88ea67d95e2) that acts like a fingerprint, ensuring that every commit can be referenced unambiguously. - A commit is a full snapshot of the working directory, constructed based on the previous commit, and the changes staged. The previous commit a commit is based on is called the parent commit (some commits can have multiple parent commits -- we’ll cover that later).
Edges in the revision graph represent links between a commit and its parent commit(s) In some revision graph visualisations, you might see arrows (instead of lines) showing how each commit points to its parent commit.
Git uses refs to name and keep track of various points in a repository’s history. These refs are essentially 'named-pointers' that can serve as bookmarks to reach a certain point in the revision graph using the ref name.
In the revision graph above, there are two refs ← master and ← HEAD.
- ← master is a branch ref. A branch points to the latest commit on a branch. When you create a new commit, the ref of the branch we are currently in moves to the new commit.
- ← HEAD is a special ref. Normally, it points to the current branch (in this example, it is pointing to the
masterbranch), and moves together with the branch ref.
↖ origin/master
In the revision graph above you see a third type of ref (↖ origin/master). This is a remote tracking branch ref that represents the state of a branch in a remote repository (if you previously set up the branch to track a remote branch). In this example, the master branch in the remote origin is also at the commit C3 (which means you have not created new commits after you pushed to the remote).
If you now create a new commit C4, the state of the revision graph will be as follows:
Explanation: When you create C4, the current branch master move to point to C4, and HEAD moves along with it. However, the master branch in the remote origin remains at C3 (because you have not pushed C4 yet).
Let us use Git features to examine the revision graph of a simple repo. For this, use a repo with just a few commits and only one branch for this hands-on practical.
1 First, use a simple git log to view the list of commits.
git log
commit f761ea63738a... (HEAD -> master, origin/master)
Author: ... <...@...>
Date: Sat ...
Add colours.txt, shapes.txt
commit 2bedace69990...
Author: ... <...@...>
Date: Sat ...
Add figs to fruits.txt
commit d5f91de5f0b5...
Author: ... <...@...>
Date: Fri ...
Add fruits.txt
For comparison, given below the visual representation of the same revision graph. As you can see, the log output shows the refs slightly differently, but it is not hard to see what they mean.
↖ origin/masterAdd colours.txt, shapes.txt
2 Use the --oneline flag to get a more concise view. Note how the commit SHA has been truncated to first seven characters (first seven characters of a commit SHA is enough for Git to identify a commit).
git log --oneline
f761ea6 (HEAD -> master, origin/master) Add colours.txt, shapes.txt
2bedace Add figs to fruits.txt
d5f91de Add fruits.txt
3 The --graph flag makes the result closer to a graphical revision graph. Note the * that indicates a node in a revision graph.
git log --oneline --graph
* f761ea6 (HEAD -> master, origin/master) Add colours.txt, shapes.txt
* 2bedace Add figs to fruits.txt
* d5f91de Add fruits.txt
The --graph option is more useful when examining a more complicated revision graph consisting of multiple parallel branches.
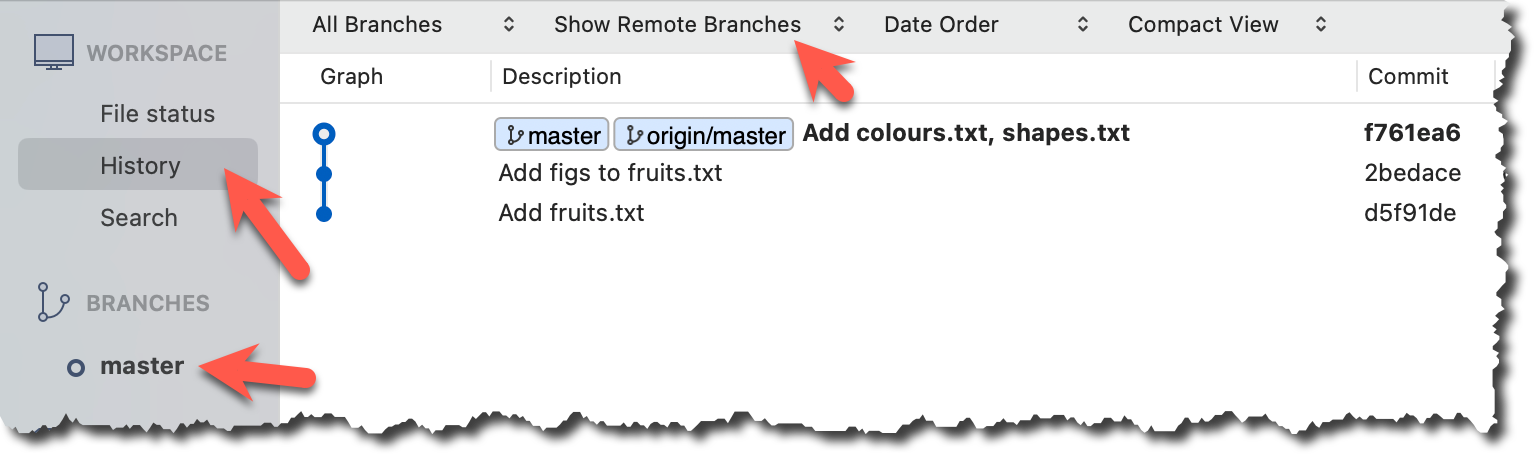
Click the History to see the revision graph.
- In some versions of Sourcetree, the
HEADref may not be shown -- it is implied that theHEADref is pointing to the same commit the currently active branch ref is pointing. - If the remote tracking branch ref (e.g.,
origin/master) is not showing up, you may need to enable theShow Remote Branchesoption.
...
Git can load a specific version of the history to the working directory. Note that if you have uncommitted changes in the working directory, you need to stash them first to prevent them from being overwritten.
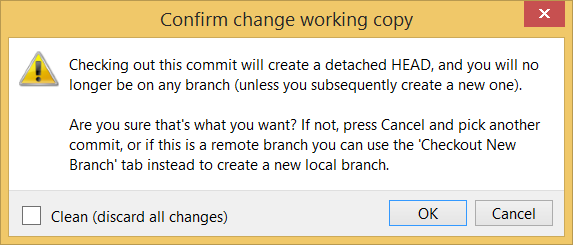
Use the checkout <commit-identifier> command to change the working directory to the state it was in at a specific past commit.
git checkout v1.0: loads the state as at commit taggedv1.0git checkout 0023cdd: loads the state as at commit with the hash0023cddgit checkout HEAD~2: loads the state that is 2 commits behind the most recent commit
For now, you can ignore the warning about ‘detached HEAD’.
If you checkout a commit that comes before the commit in which you added the .gitignore file, Git will now show ignored files as ‘unstaged modifications’ because at Git hasn’t been told to ignore those files.
Double-click the commit you want to load to the working directory, or right-click on that commit and choose Checkout....
Click OK to the warning about ‘detached HEAD’ (similar to below).
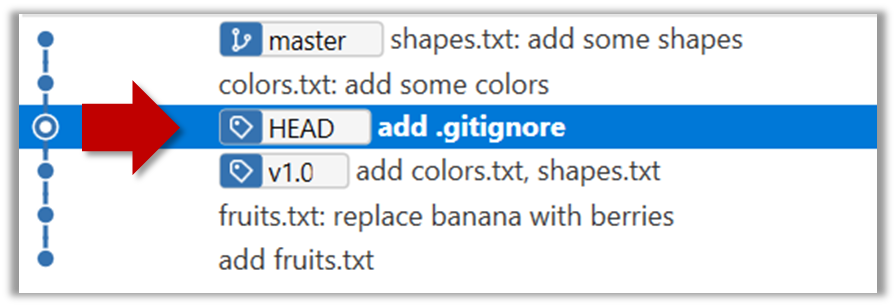
The specified version is now loaded to the working folder, as indicated by the HEAD label. HEAD is a reference to the currently checked out commit.
If you checkout a commit that comes before the commit in which you added the .gitignore file, Git will now show ignored files as ‘unstaged modifications’ because at Git hasn’t been told to ignore those files.
To go back to the latest commit, double-click it.
...
Each Git commit is uniquely identified by a hash e.g., d670460b4b4aece5915caf5c68d12f560a9fe3e4. As you can imagine, using such an identifier is not very convenient for our day-to-day use. As a solution, Git allows adding a more human-readable tag to a commit e.g., v1.0-beta.
Here's how you can tag a commit in a local repo:
To add a tag to the current commit as v1.0:
$ git tag v1.0
To view tags:
$ git tag
To learn how to add a tag to a past commit, go to the ‘Git Basics – Tagging’ page of the git-scm book and refer the ‘Tagging Later’ section.
Right-click on the commit (in the graphical revision graph) you want to tag and choose Tag….
Specify the tag name e.g. v1.0 and click Add Tag.
The added tag will appear in the revision graph view.
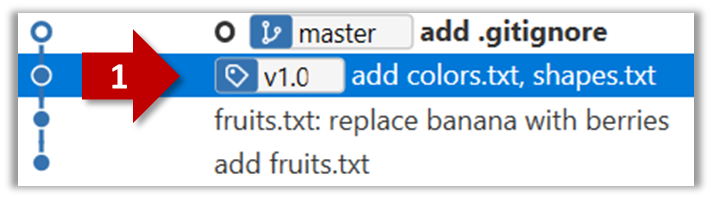
After adding a tag to a commit, you can use the tag to refer to that commit, as an alternative to using the hash.
Annotated vs Lightweight Tags: The Git tags explained above are known as lightweight tags. There is another type of Git tags called annotated tags. See git-scm.com/book for more info.
Tags are different from commit messages, in purpose and in form. A commit message is a description of the commit that is part of the commit itself. A tags is a short name for a commit, which exists as a separate entity that points to a commit.
...
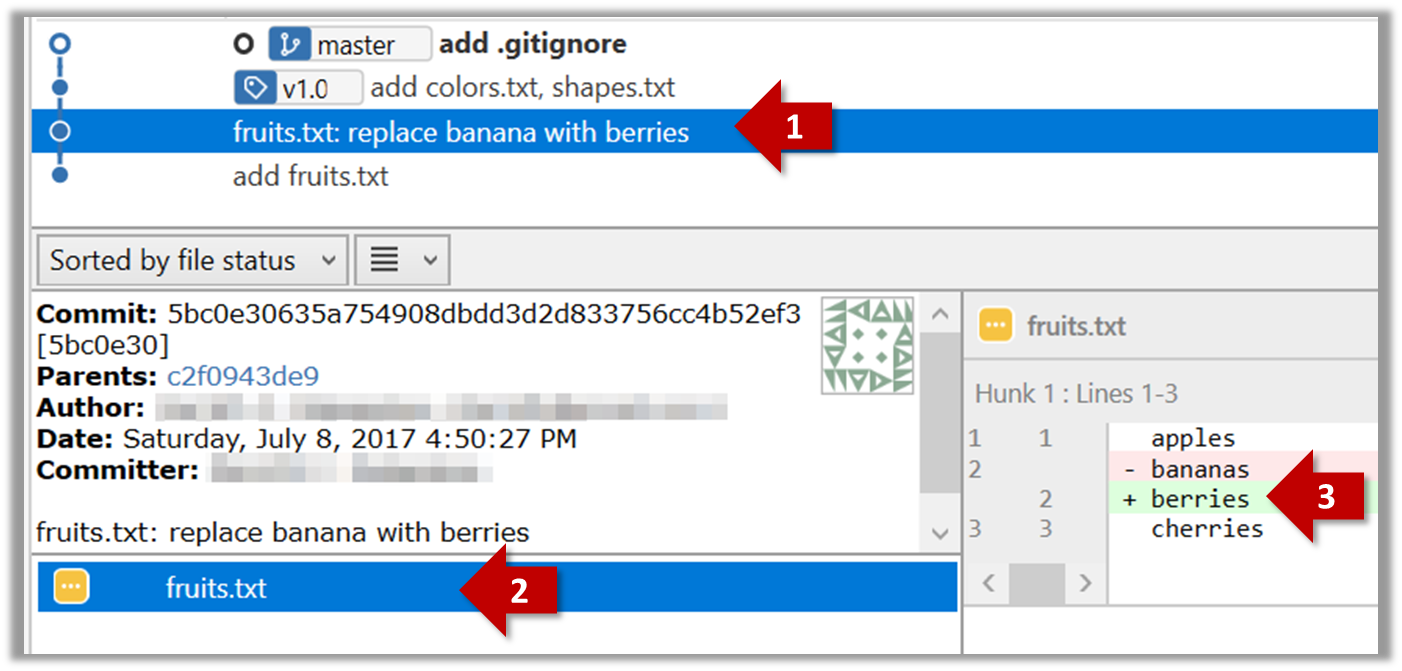
Git can show you what changed in each commit.
$ git show < part-of-commit-hash >
Example:
$ git show 5bc0e306
commit 5bc0e30635a754908dbdd3d2d833756cc4b52ef3
Author: … < … >
Date: Sat Jul 8 16:50:27 2017 +0800
fruits.txt: replace banana with berries
diff --git a/fruits.txt b/fruits.txt
index 15b57f7..17f4528 100644
--- a/fruits.txt
+++ b/fruits.txt
@@ -1,3 +1,3 @@
apples
-bananas
+berries
cherries
To see which files changed in a commit, click on the commit. To see what changed in a specific file in that commit, click on the file name.
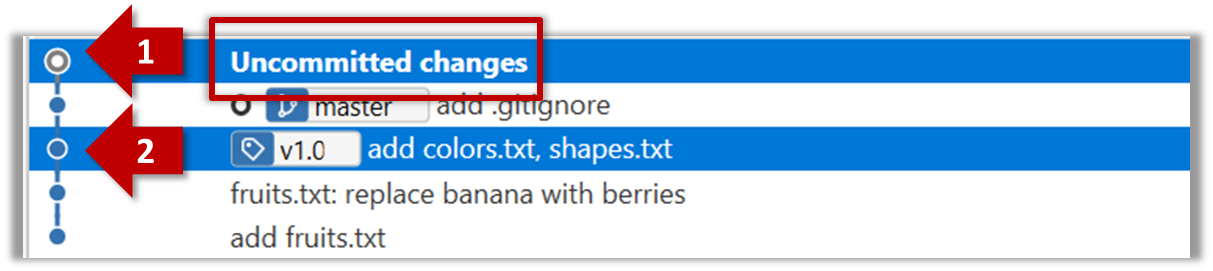
Git can also show you the difference between two points in the history of the repo.
The diff command can be used to view the differences between two points of the history.
git diff: shows the changes (uncommitted) since the last commit.git diff 0023cdd..fcd6199: shows the changes between the points indicated by commit hashes.
Note that when using a commit hash in a Git command, you can use only the first few characters (e.g., first 7-10 chars) as that's usually enough for Git to locate the commit.git diff v1.0..HEAD: shows changes that happened from the commit tagged asv1.0to the most recent commit.
Select the two points you want to compare using Ctrl+Click. The differences between the two selected versions will show up in the bottom half of Sourcetree, as shown in the screenshot below.
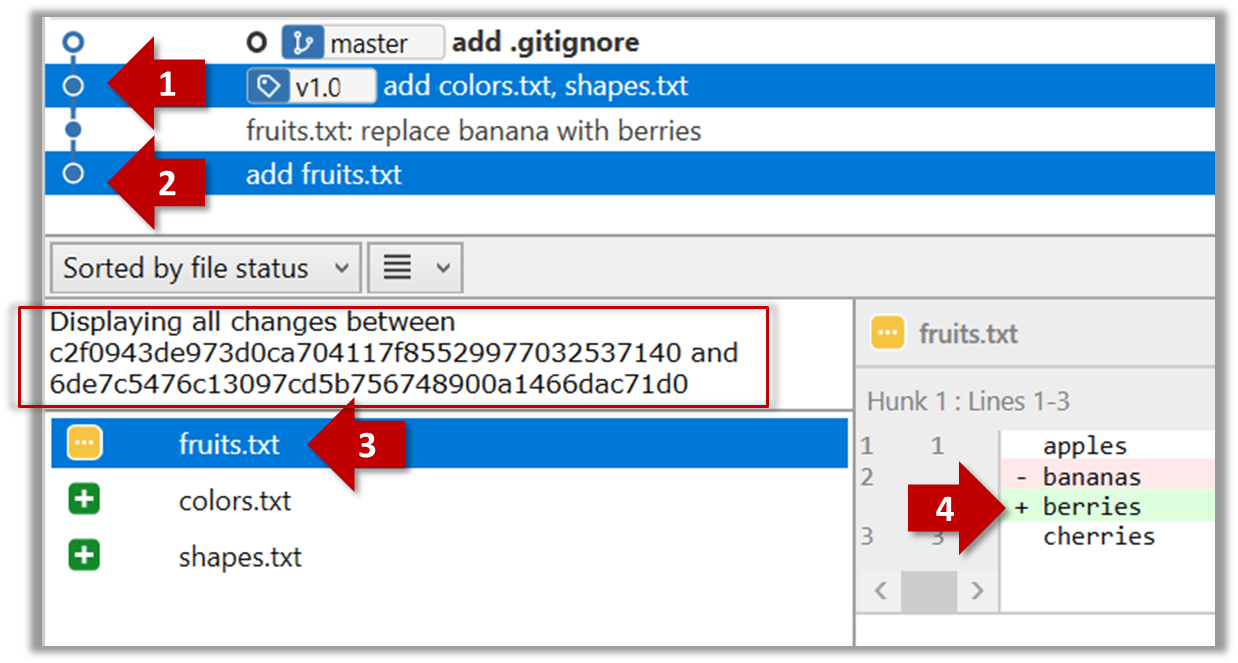
The same method can be used to compare the current state of the working directory (which might have uncommitted changes) to a point in the history.
What you learned: ...
What's next: coming soon ...